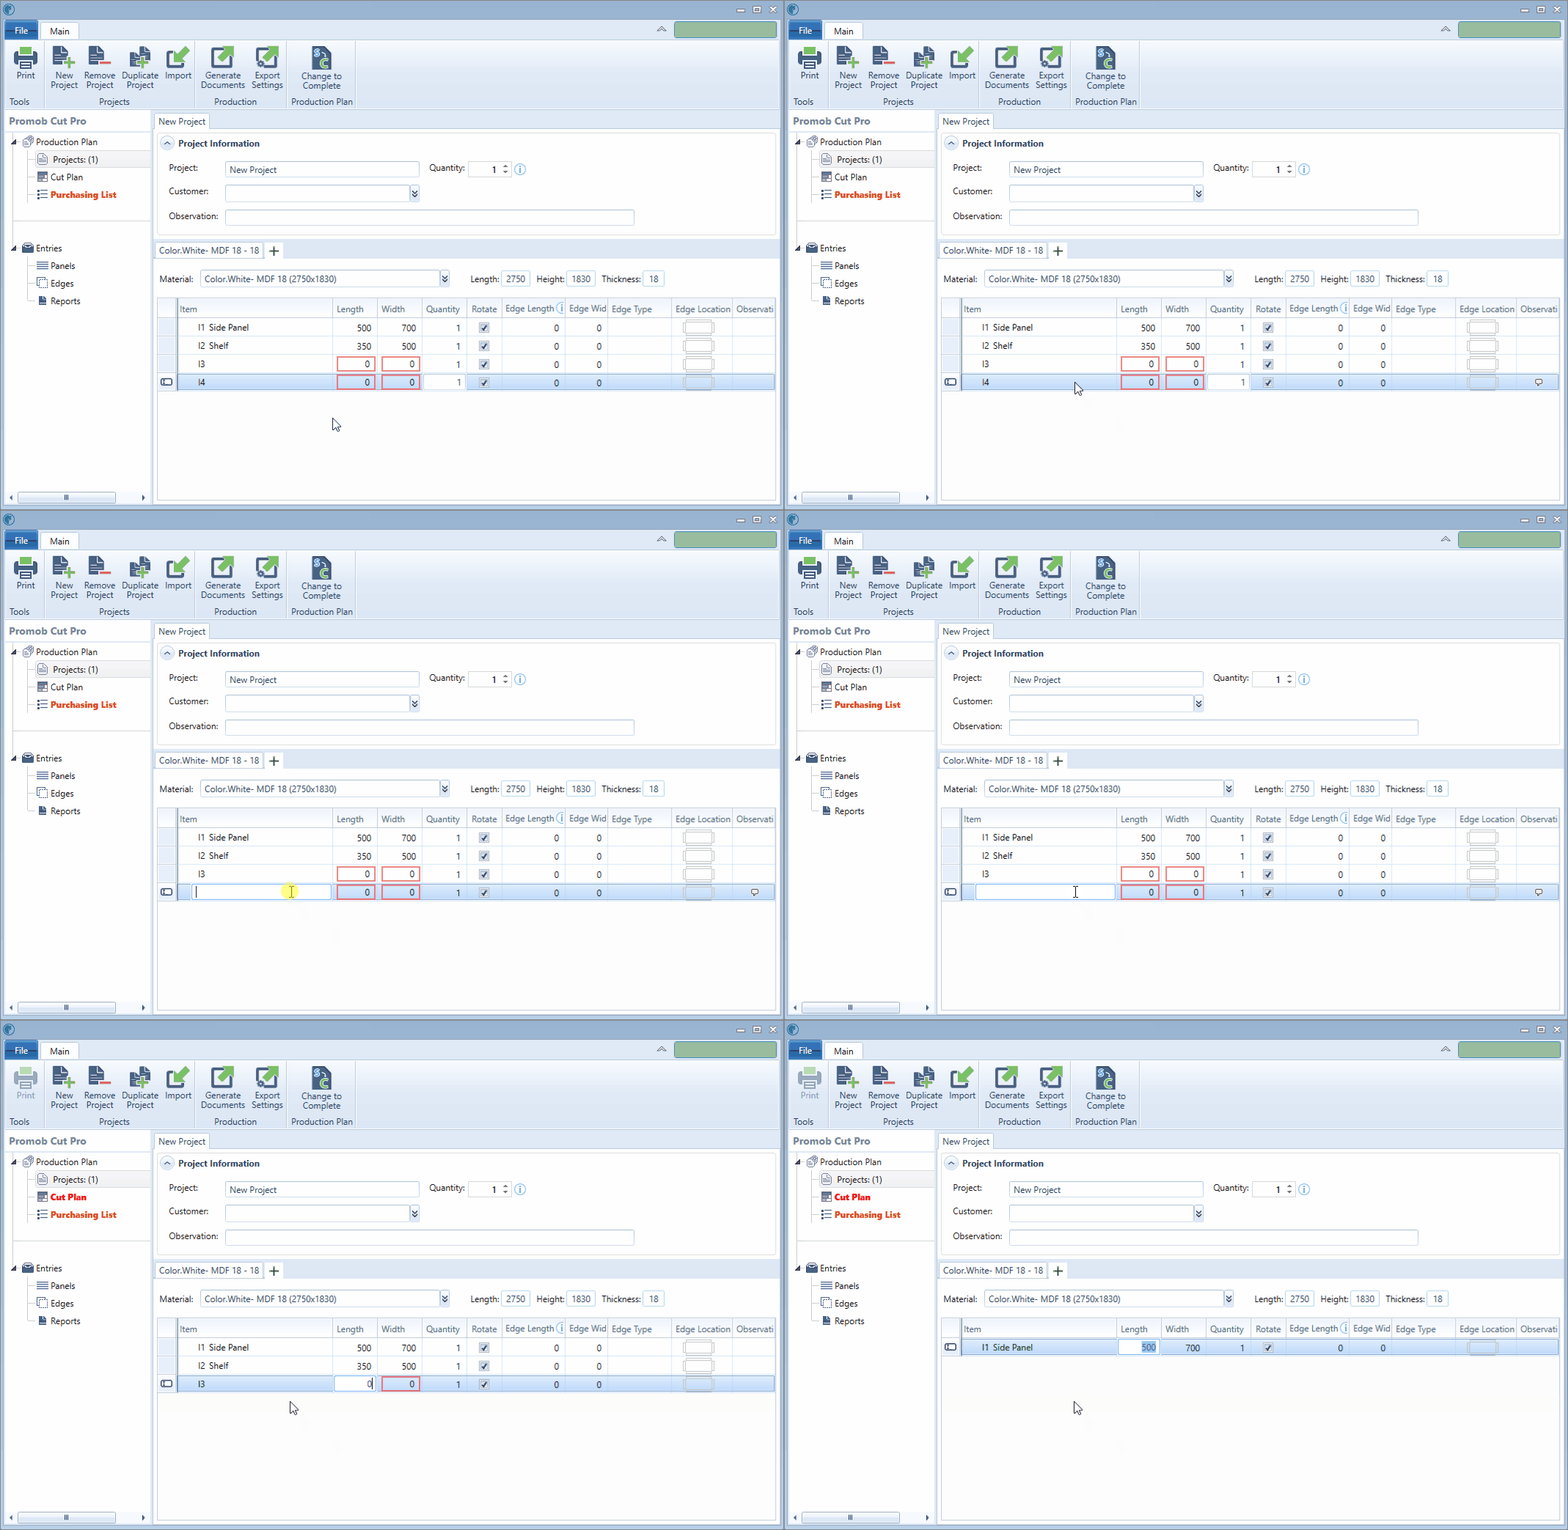
The edited and registered information is automatically saved in the database and it is not necessary to save manually.
Which Cut Pro configuration do you use?
Select the configuration used below and directly access the ideal content to help you.
Cut Pro Complete configuration.
Cut Pro Simplified configuration.
Review Cut Pro's Complete configuration and Simplified configuration here.
Also, review the documentation regarding the project changes. Click here.
Complete Configuration
To directly access your question, click below on one of the contents of the Complete configuration.
|
- Reviewed |
VIEWING ITEMS |
Columns
See below for module information you can edit

Item
- Field to define the name of the item;
- Double click on the item name and change the item name.
Width / Length
- Field to define the width or length of the item;
- Click on the value in the item row and change the value.
Depth
- Field to define the depth of the item;
- Click on the value in the item row and change the value.
Thickness / Height
- Field to define the thickness or height of the item;
- Click on the value in the item row and change the value.
NOTES:
The Cut Pro allows formulas in the Width/ Length, Depth and Thickness/ Height fields.
The allowed operations are: + (addition), - (subtraction), * (multiplication), / (division) and ^ (power).
Remembering that the fields do not support variables.
The entered formulas will not be stored, when leaving the field the formula will be resolved and the result will be inserted in place.
Raw material
- Field to define the raw material of the plate that will be used to manufacture the item;
- Click on the raw material in the item row and change it to another raw material.
- Click here to learn more;
Edge Band
- Border application on the sides of the item;
- Click here to learn more;
Operations
- Field available when the Operations Editor plugin is active in Cut Pro;
- You can add drills, slots, define edge tape application sides, save/edit schemes, and define the alignment face of parts;
- Click on the image displayed in the Operations column to open the Editor.
- To know how to activate plugins click here;
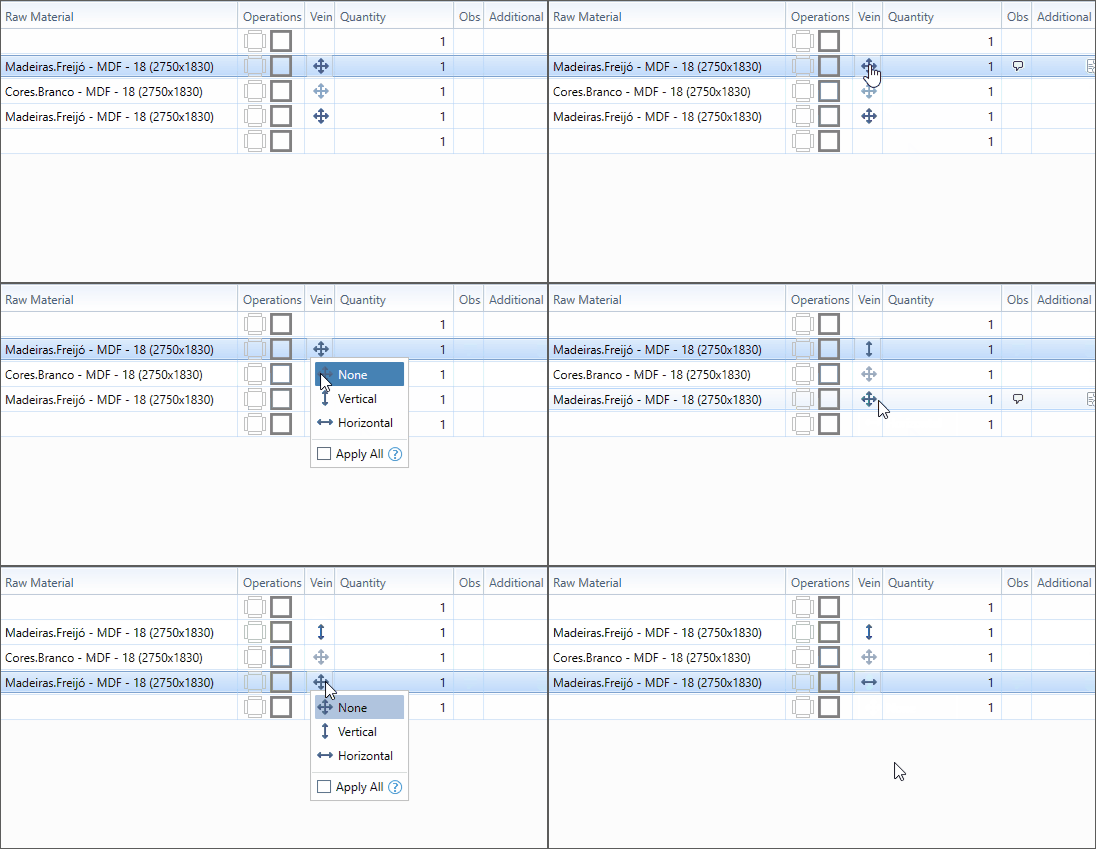
Vein
- Field to define the direction of the vein raw material.
Quantity
- Field to define the quantity of items to be produced;
- Click on the item row in the Quantity column and enter the value to be produced.
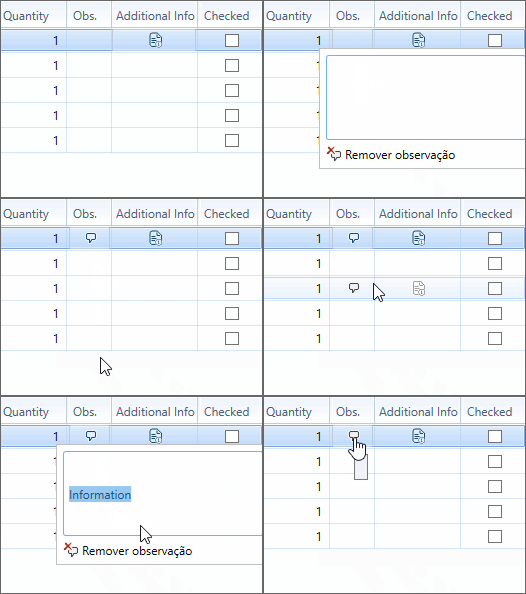
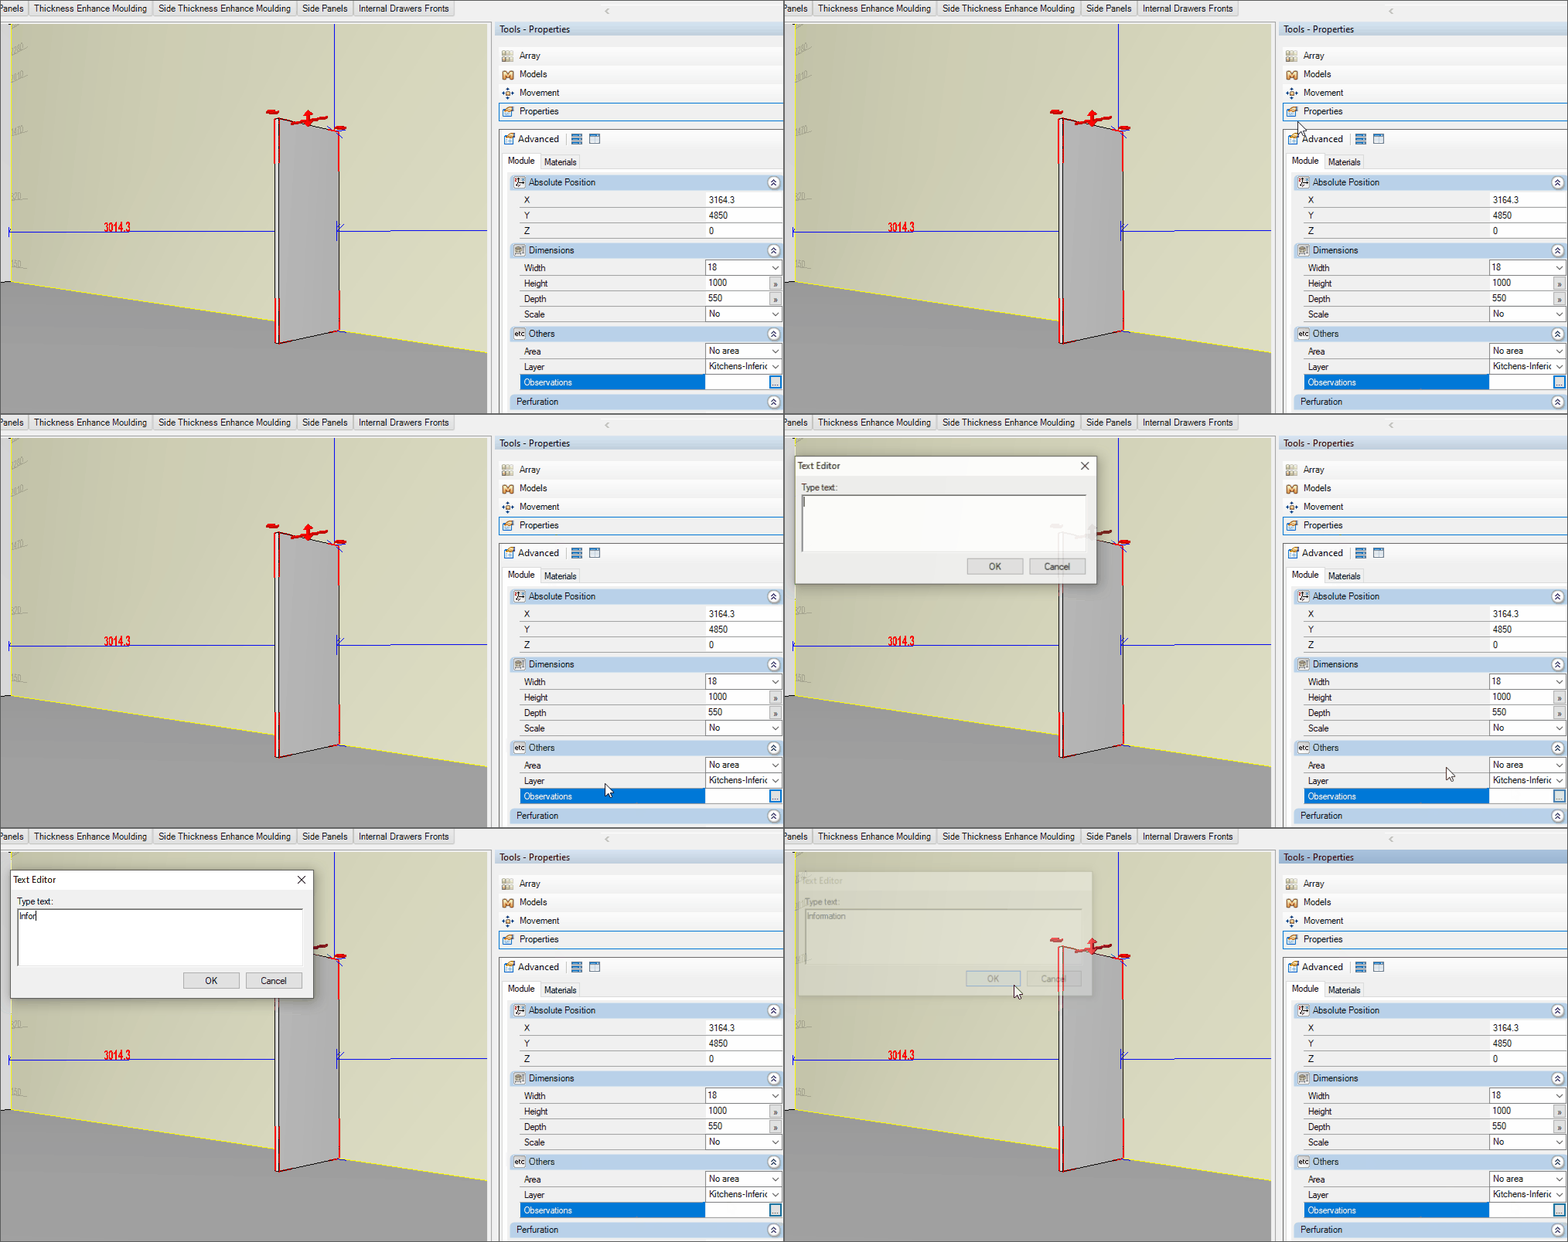
Observation
- Field to include item remarks;
- The note will be viewed in the Cut Plan, more specifically in the Cut List.
- Click on the Observation column and enter the desired information;
- Clique fora da área de digitação para fechá-la.
- To delete the entered information, click Remove Note.
- Promob registered information is imported into Cut Pro automatically, click here to learn more;
Reviewed
- Assists in reviewing project items.
- Select the Reviewed column checkbox in the row of modules and parts that have already been reviewed.
Items Editing
New Item
- Option to add a new item to the project;
- Click on the New Item button;
- In the blank line displayed at the end of the table enter the requested information.

Remove Item
- Option to remove an item from the project;
- Select the row for the module you want to delete and click the Remove Item button or press the Delete key;
- Pressing the delete key will reset the item quantity to zero;
- Pressing the key again removes the item from the project;
Duplicate Item
- Option to duplicate a project item;
- Select the line for the module you want to duplicate and click the Duplicate Item button;
New Child
- Option to insert a new item that makes up another item
- Select the item row for which you want to insert a new item;
- Click on the New Child button;
- In the blank row displayed at the end of the table record requested information;
- The new item will show the last raw material that was selected;
Remove Child
- Option to remove the child item that makes up an item.
- Select the line for the item you want to delete and click the Remove Item button or press the Delete key;
- Pressing the delete key will reset the item quantity to zero;
- Pressing the key again removes the item from the project;
Revert Item
- Option to undo changes made;
- Select the table row for the item you want to revert;
- Click the Revert Item button.
- You can revert an item by clicking on the status of the item that has been changed by selecting the Revert Item option;
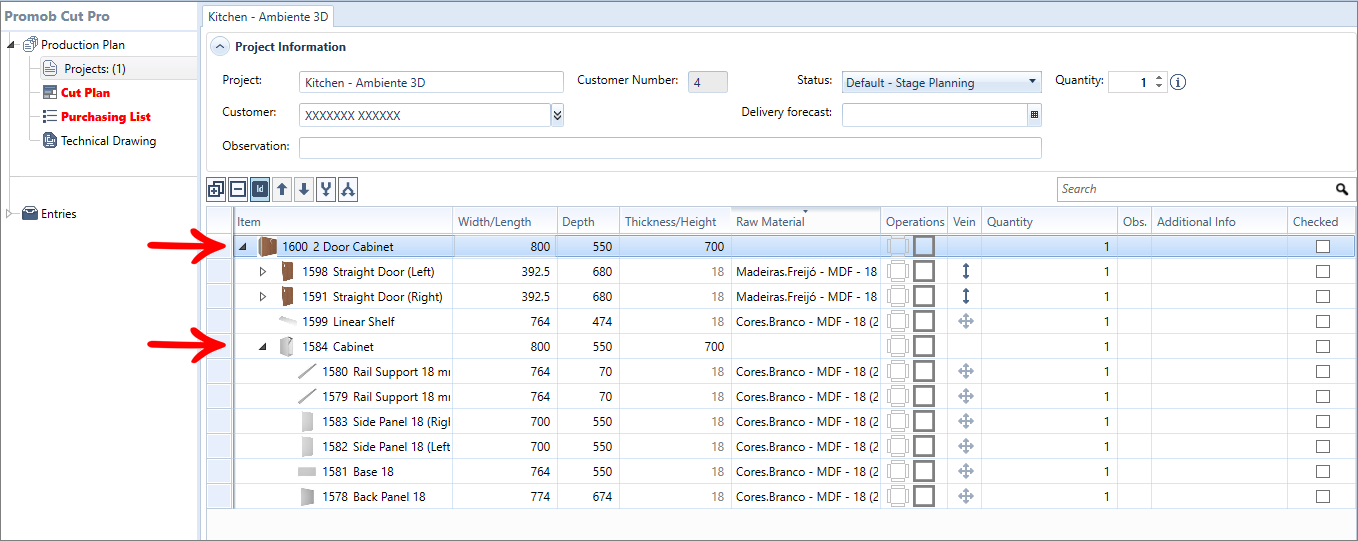
View modules
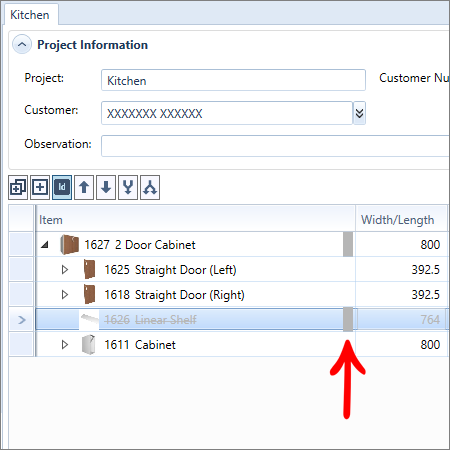
- The components of the modules are displayed hierarchically;
- To view the children of an item click the arrow next to the module name;

- Note that the 2 Door module, for example, consists of the items highlighted in the image below;
- The counter component is made up of more items;
- To hide the preview of the module's children click again on the arrow.
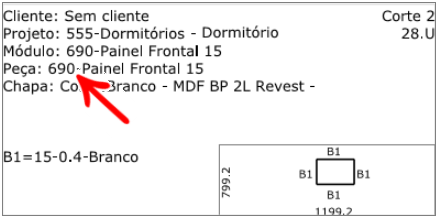
Show unique ID

- The ID can also be identified on the labels.
Expand All
- Displays all components of project modules;
Close Items
- Retract all component of the project modules;

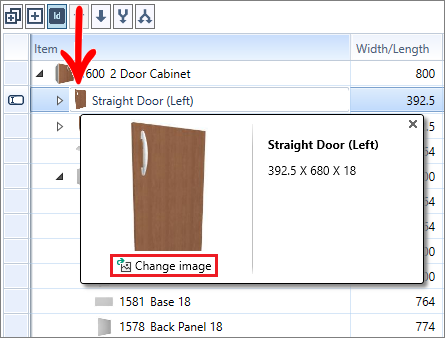
Change the image of an item
- Click on the current image of the item;
- In the window that appears click on Change image;
- Locate the new item image and click Open.
Identification of changed items
- When some module information is changed, the depth and width, for example, is displayed next to it in the module name.
- When hovering over the indication, displays information about the change that has been made. The changes made to child items are also displayed in parent items.
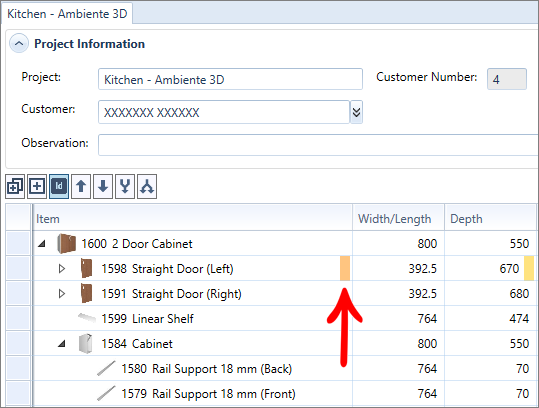
Item with changes
- Indicates when the value of any item property changes.
- It is represented by the color orange;
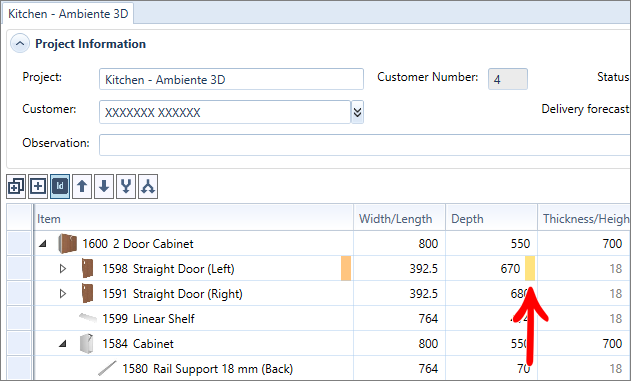
Changed Value
- Indicates which value has changed in the item;
- It is represented by the color yellow;
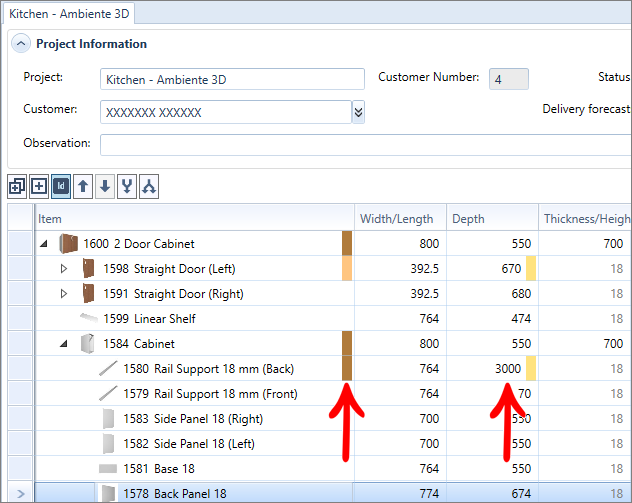
Item with incompatible dimensions for cutting plane
- Indicates when the item dimensions do not match the dimensions of the plate or the item dimensions are larger than the maximum registered dimension of cut.
- It is represented by the color brown;
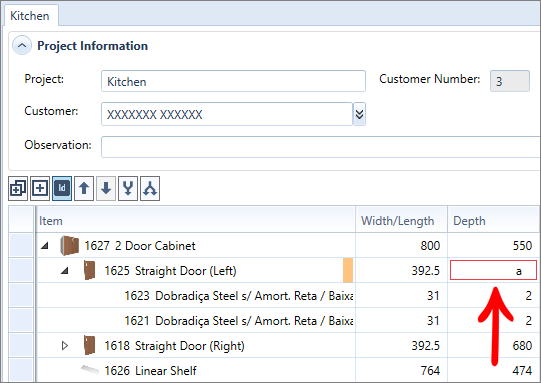
Invalid value
- This indicates when an invalid value is filled for one of the properties.
- It is represented by the outlined line in red;
Item removed from the project
- Indicates when an item is excluded from the project, or when the quantity of an item is reset;
- It is represented by the color gray;
Simplified Configuration
To directly access your question, click below on one of the contents of the Simplified configuration.
|
|
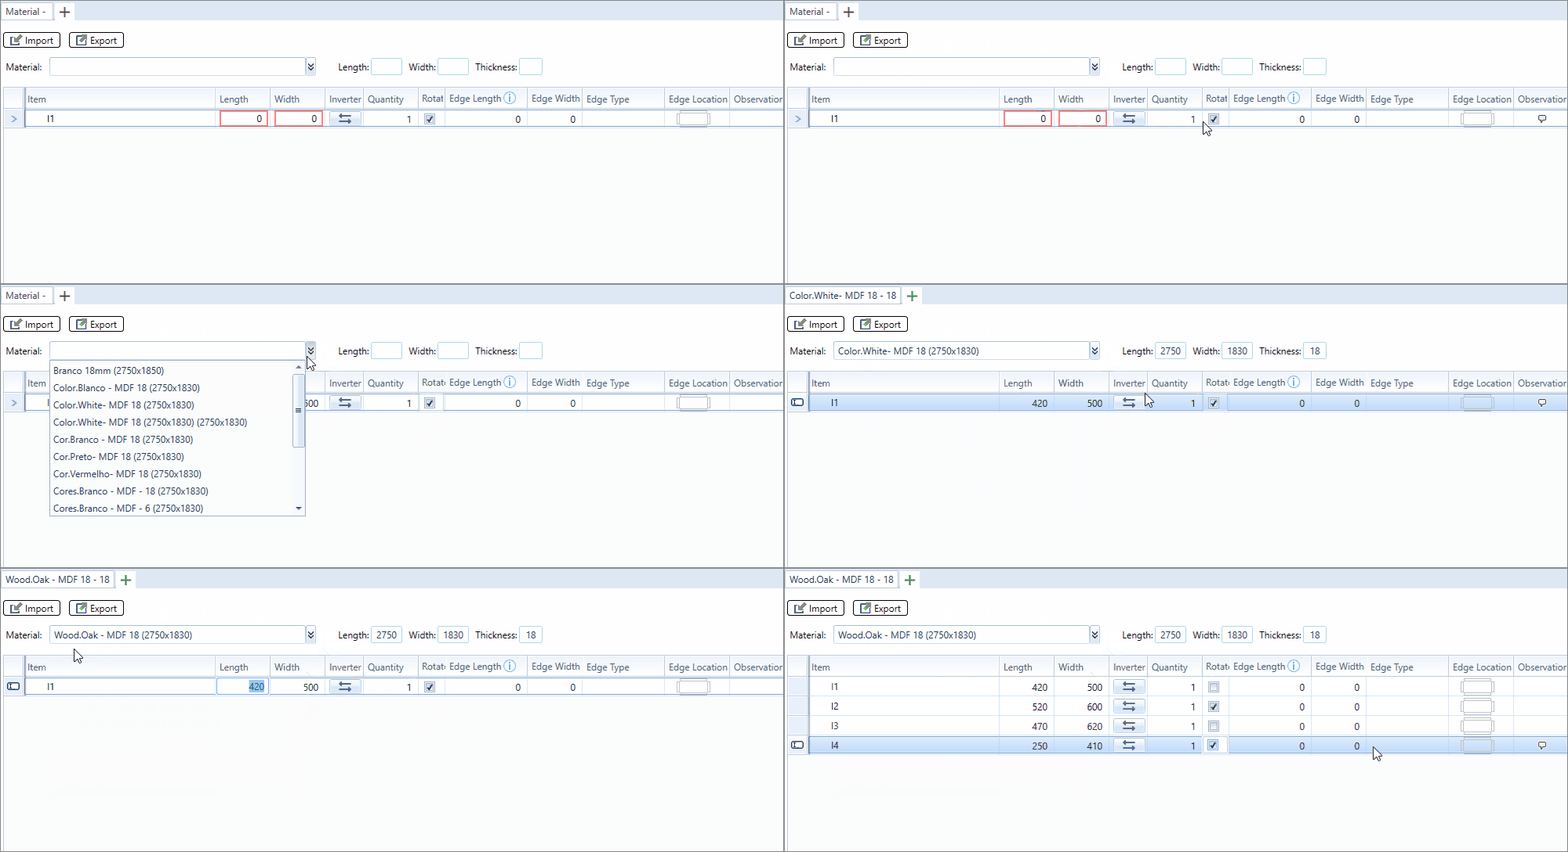
Material
- In this tab you can define and change the material to be used, that is, which plate will be used to cut the pieces;
- For this, the material must already be registered. Click here to know more about the registration of plates;
- With the material registered, select the Material tab and choose the material to be used;
- To use two or more materials, click on the Add Material icon.

Columns
Check which columns are displayed in Simplified mode:
Item
- Field to define the name of the item;
- By default, on each plate, items already have a unique ID code, for example, I1, I2, I3. Where I refer to the initial letter of the word Item and the number, refers to the line number where the item was registered;

- To register the name of the item, double-click on the item code, or navigate through the arrows on your keyboard to the Item column and change the name of the item;
- Note that the default code will remain next to the item's name.

Length/Width
- Fields to define the width and length of the item;
- Click on the field of one of the columns, in the item line, and change the value;
- Or navigate through the arrows on your keyboard to the columns to change the value;
- The value entered in these fields is a determining factor for the direction of the vein of the piece;
- Remember that the orientation of the plate vein in the cut plane is determined by the plate registration. Check here how to interpret the direction of the vein through the dimensions of the part.

Invert
- Column was available from version 1.2.4.X
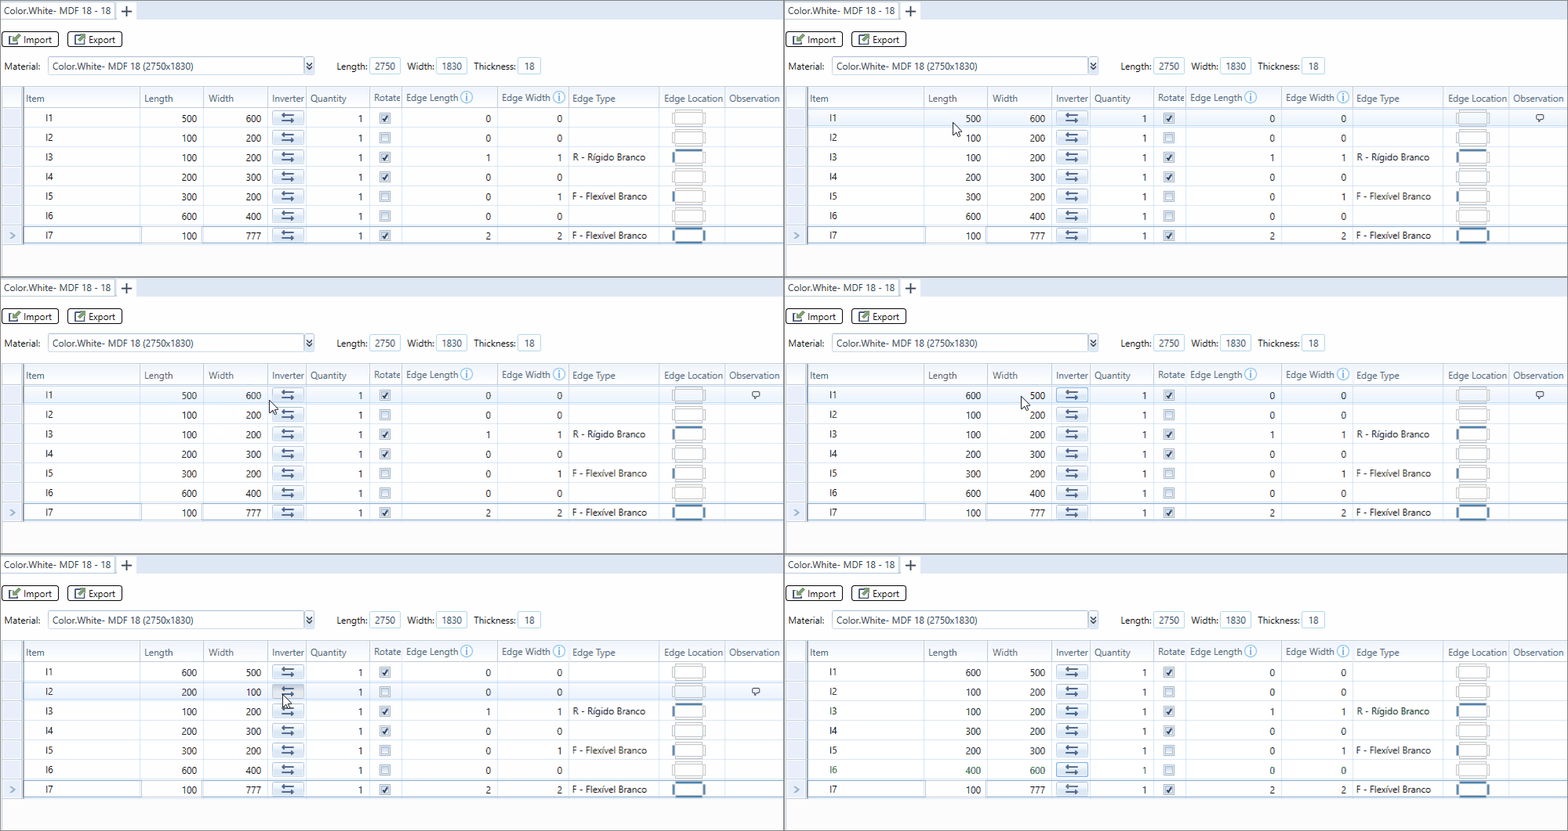
- In this column, it is possible to invert the order of the measurements already registered in the Width and Height fields;
- To invert, it is necessary to press the Invert button on the line of the item that you want to invert the measurement;

- By inverting the Width and Height measurements, it may imply the direction of the workpiece vein, if the workpiece has veins. For more information on how to define the direction of the vein click here.
Quantity
- Field to define the number of times the item needs to be produced;
- Click or navigate with the arrow keys on the item line in the Quantity column and enter the amount to be produced.

Rotate
- This option will determine whether the shaft defined before, in the Width and Length columns, will be respected or not;
- Since version 1.2.4.X, by default, the first item in the list will always display the Rotate blocked option, as it is present before informing the material used. From the second item onwards, the reference to the field Vein from the plate's register will be searched;
- When registering a plate in the Plate Entries and informing in the register that the plate has a vein, this option will automatically be loaded unchecked, as it understands that the piece needs to keep the vein;
- Since version 1.2.4. X, if there is no registration of the plate the option of Vein on the plate was not checked, this option will be blocked, as it understands that the piece has no defined vein direction;
- If this option is checked, Cut Pro can position the part on the plate in a random direction, to find a better use of the plate;
- If it is important to maintain the vein direction defined in the dimensions of the part, do not check this option;
- To select and deselect the option, click once with the mouse, or use the Space key on your keyboard.

Edge Width / Length
- In this column, you must indicate which side of the part will have an edge band;
- The Edge width and Edge length columns, respectively, refer to the Width and Length dimensions registered on the part;
- View in the Edge Location column a preview of the position of the borders;
- To apply the edge band, in one of the Width / Length columns of the edge band, press the Space key on your keyboard, or type the values, 0, 1 or 2;
- Where 0 refers to none of the sides of the part, 1 just one side of the part and 2 to both sides of the part. See the example:

Edge Band Type
- In this column, you must indicate which type of edge band will be used in the application of the item;
- For this, it is necessary that the edge registration has already been carried out. Click here to check how to register the border in simplified mode;
- To define the edge band type, select manually with the mouse, or press the Space key on your keyboard to change the border options.
Edge Band Location
- This column shows the preview of the edge band position;
- When changing the edge band indication in the Width and Edge Length columns, the preview will change the edge of the position simultaneously.
Observation
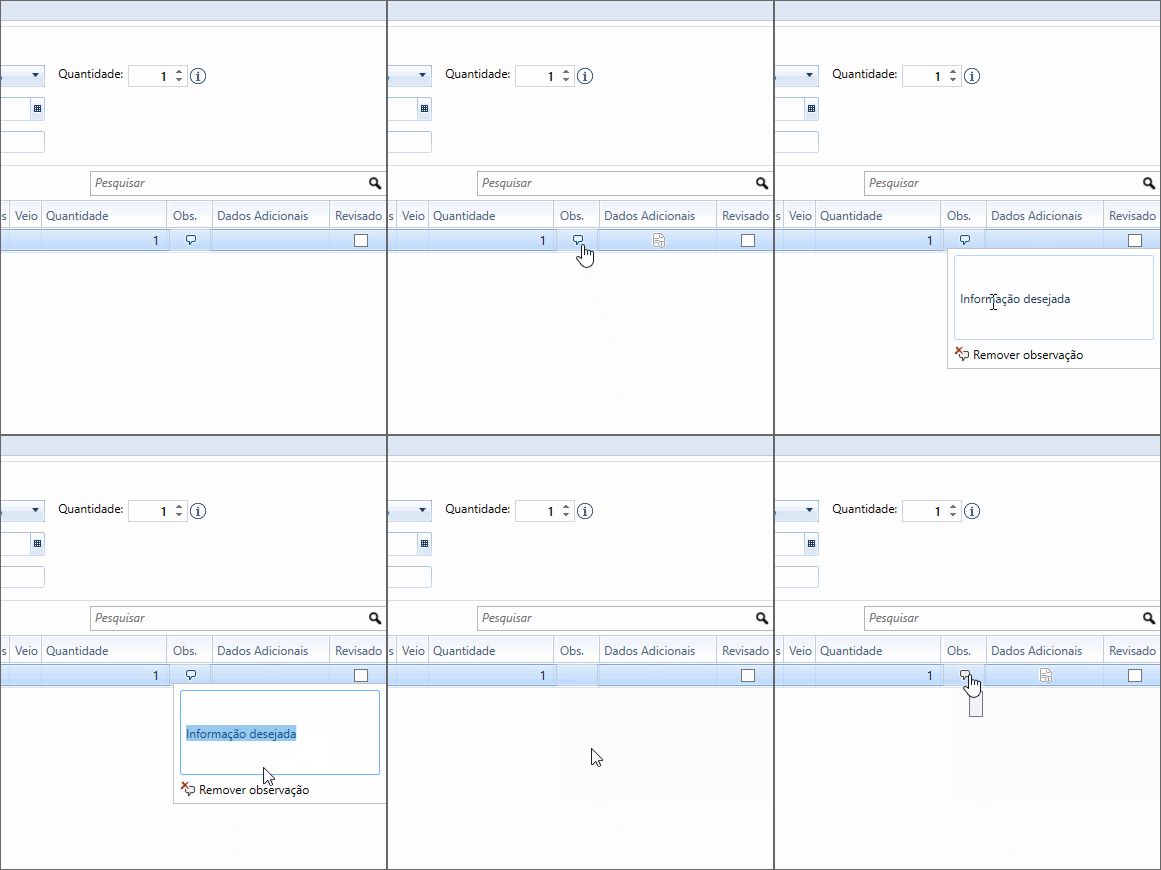
- Field to include item observations;
- The observation will be visualized in the Cut Plan, more specifically, in the Cut List;
- Click in the Observation column and enter the desired information;
- Click outside the typing area to close it;

- To delete the registered information, click in the text box, then click Remove Observation.
Items Editing
New Item
- After defining the material in which the item will be manufactured, you can add items;
- After registering the first item, filling the necessary information, press the Tab key or the Right Arrow on your keyboard, until a new blank line appears.


- The new item inserted will always look for the reference to the last registered item;
- We can see in the example below, that when deselecting the option Rotate and apply edge bands, the next item is already inserted with the option Rotate unchecked, and when the edge band field is filled, when pressing Tab the type of edge band is automatically registered for the same type edge band selected in the previous item.

Remove Item
- To remove the item, select the item's line and press the Delete key on the keyboard.
