In this article the following content will be covered:
- Remove walls
- Building walls in the 3D space
- Building walls in the Wall Editor
- Dimensioning the walls in the Wall Editor
- Building curved walls
- Building angled walls
- Building walls with reference
- Moving wall
- Wall Properties
- Segmenting wall
- Meeting walls
- Tool 30-40-50
Remove walls
1. Select the wall in the 3D space or via the Wall Editor.
2. Press the Delete key or right-click on the wall and select the Delete option.
3. Select one of the options:
- Segment: removes only the selected wall
- All: removes all walls from the design
- Keep selected: deletes all wall segments except the selected segment
- Remove modules that are in the wall: removes modules that have been inserted into the wall

Building walls in the 3D space
The construction of the walls through the 3D space can be done in two ways, without and with precision.
No precision
1. Click on the Build Walls button in the upper toolbar and then click on the floor in the 3D space, where the wall construction will start.
2. Move the mouse pointing in the direction where you want to build the wall. Once you have defined the length of the wall, click with the left mouse button to finish the construction of the first wall.
3. To continue inserting walls, position the mouse to the direction and size you want to build the second wall and then left click again.
4. When you click on the starting point of the construction click Yes in the message that is displayed to finish the construction, or right click.
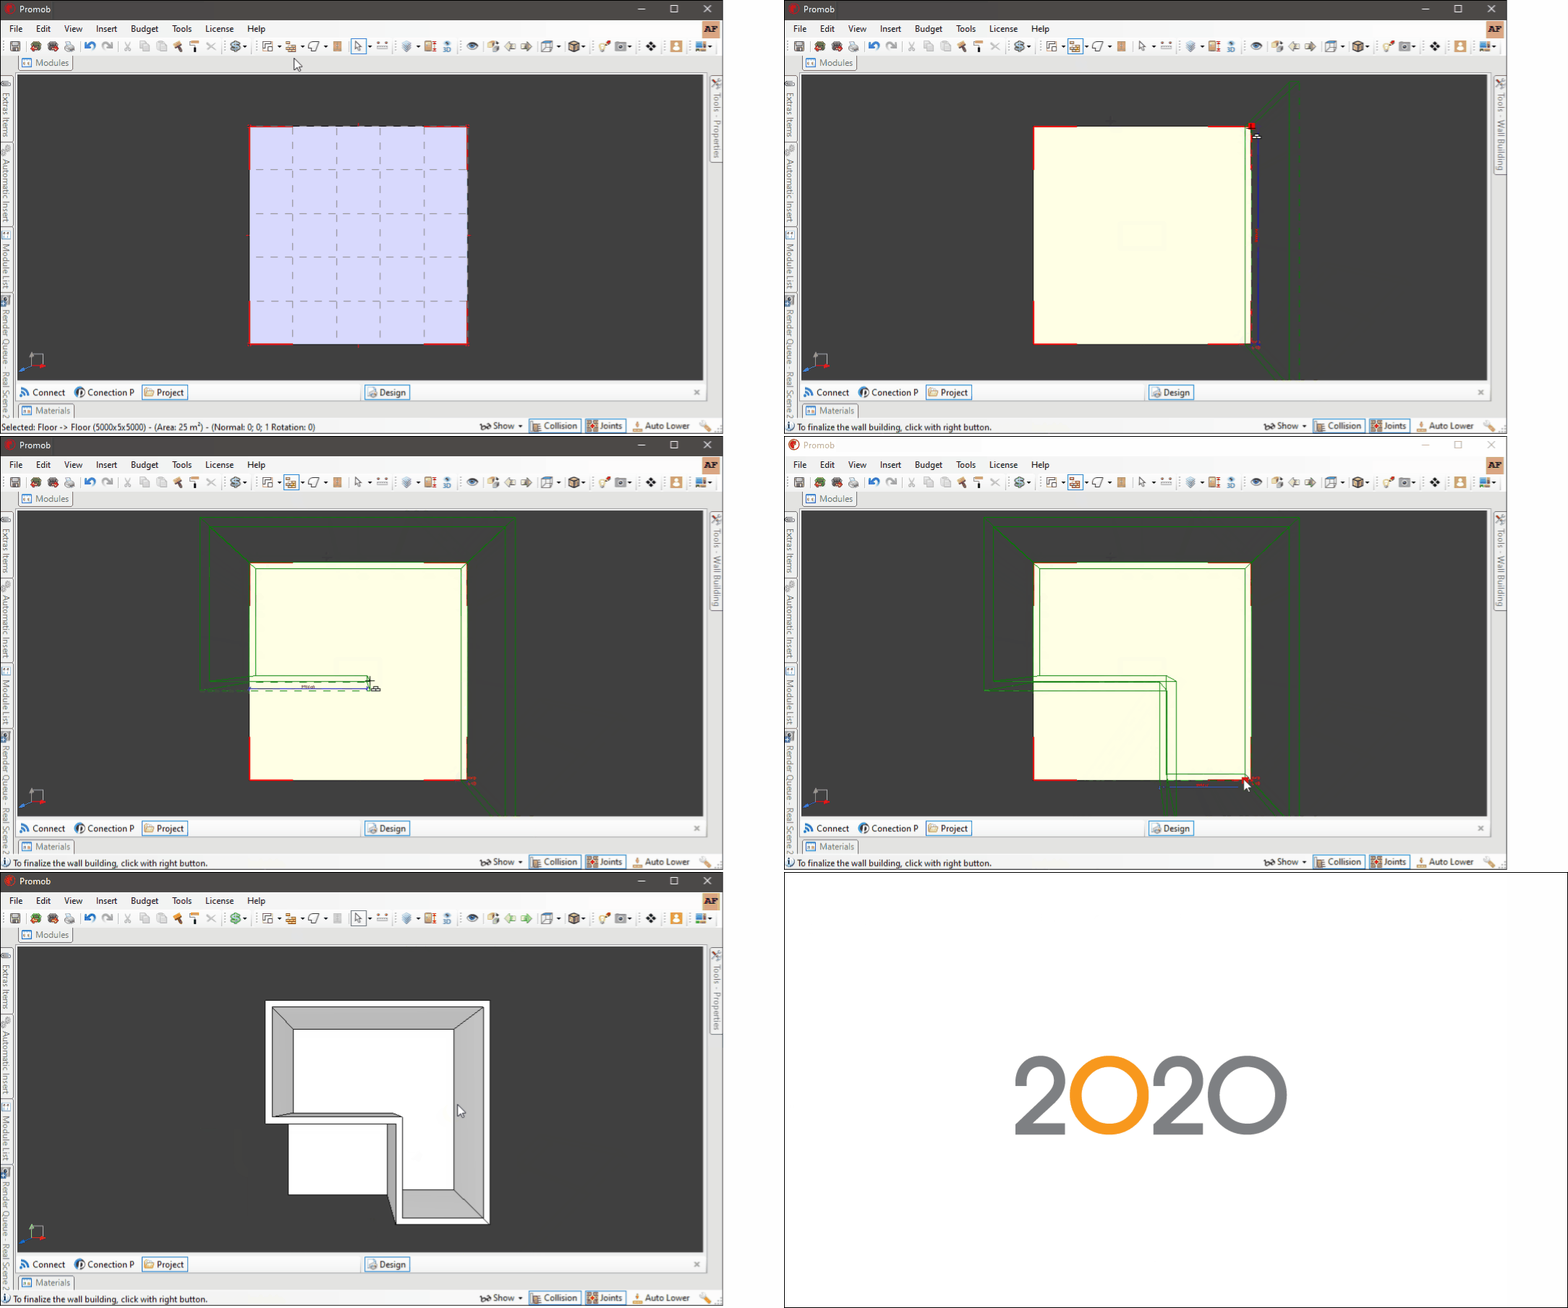
IMPORTANT: When using the last wall to close an space, the message Do you want to close the wall and finish your construction will be displayed. Click Yes if you want to finish the construction or No if you want to continue building walls.
With precision
To make it easier to insert walls accurately, first enable and fix the Tool Panel.
1. Click on Build wall on the top toolbar and then click on the floor in the 3D space, where the wall construction will start.
2. Note that in the Tools tab - Wall Construction is enabled with the following properties:

- Length: is the total length of the wall segment
- Absolute Angle: is the angle of the wall segment considering the space as a whole
- Relative Angle: is the angle of the wall considering the previous wall
- Height: is the distance from the floor to the top of the wall (ceiling height)
- Thickness: is the thickness of the wall
- Spacing: is the spacing of the wall in relation to the floor
- Incr. Linear: it is the "jump" of the mouse cursor regarding the length. The measure of the wall advances according to the value informed in this property. For example, every 50 mm
- Incr. Angular: it has the same functionality as Linear Increment, but this refers to the angle. For example, the angle is reported every 5 degrees
- Orientation: indicates the side of the wall that will receive the value informed in the length field. For the alignments to be respected, the wall construction must respect the clockwise direction

- Wall Type: allows you to select the type of wall that will be built
3. When typing the measurement, note that the value will be filled in the Length field, to change some other property, use the Enter key to jump to the next properties.
4. To continue building the walls, position the wall to the desired direction and enter the new value, then press the Enter key. Repeat the same process until you have built all the desired walls. When you click at the construction starting point, click Yes on the message that is displayed to finish the construction or right-click.

To determine two heights for the same wall:
1. Build the walls of the room and then segment them;
2. Select the wall and access the Tool Panel - Properties. Enter the value of the Initial Height and note that the same value is applied to the Final Height;
3. Go to the Final Height property and enter the same height as the other wall segment. Notice the difference between the initial and final wall height.

Building walls in the Wall Editor
The construction of walls using the Wall Editor can be done in 2 ways, without and with precision.
No precision
1. Click on Wall Editor in the top toolbar.
2. As the Add Wall tool is already enabled when accessing the Wall Editor, click with the mouse to define the start of construction;
3. Move the mouse cursor towards the wall and, after setting the length, click the left mouse button;
4. Repeat the same procedure to build the remaining wall segments;
5. When you click on the start point of the construction, click Yes on the message that appears to finish the construction or right-click.

With precision
1. Click Wall Editor on the top toolbar.
2. Since the Add Wall tool is already enabled when you access the Wall Editor, click the mouse to define the beginning of the construction and its direction. Define the following properties while building the wall:
IMPORTANT: The following properties can be set during or after the wall construction process
- Length: is the total length of the wall segment. This value can be entered using the keyboard
- Absolute Angle: is the angle of the wall segment considering the space as a whole
- Relative Angle: is the angle of the wall considering the previous wall
- Lock Angle: it is possible to block the absolute and relative angles, so the construction from the block starts to respect the informed angle. IMPORTANT: The angle lock feature is only available as of version 5.60.11.20
- Thickness: is the thickness of the wall;
- Initial Right Foot: is the height from the beginning of the wall
- Final Right Foot: is the height of the end of the wall
- Orientation: indicates the side of the wall that will receive the value informed in the length field. For the alignments to be respected, the wall construction must respect the clockwise direction;
- Wall Type: allows you to select the type of wall that will be built, normal or Dry Wall.
5. Repeat the same procedure to build the remaining wall segments
6. When you click on the start point of the construction, click Yes on the message that is displayed to finish the construction or right-click.

Grid on the floor
When creating a wall from the Wall Editor you can display the grid on the floor, this assists in the accuracy of the wall construction. To do this:
1. In the Wall Editor, select Show/Hide grid:
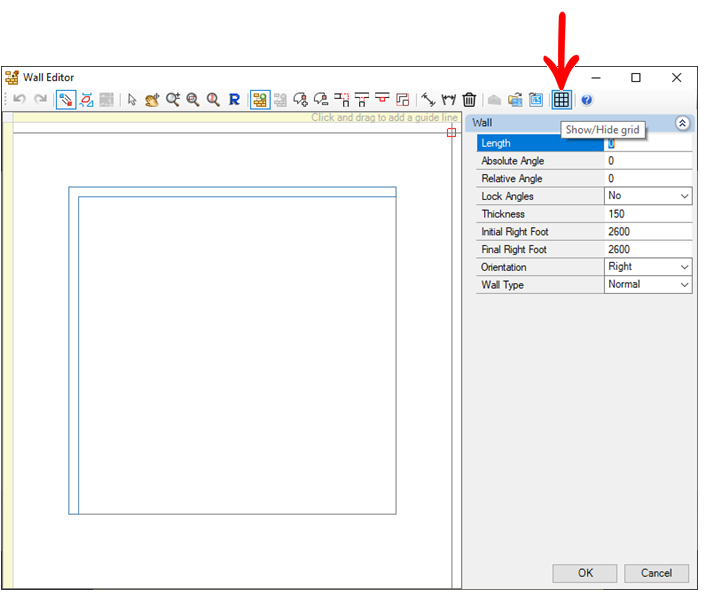
2. The grid will be displayed in the environment. If you need to hide the grid, click Show/Hide grid again.
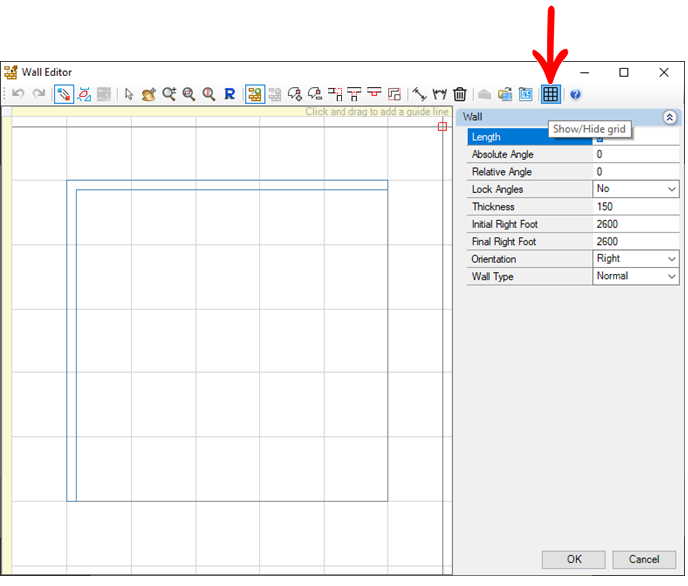
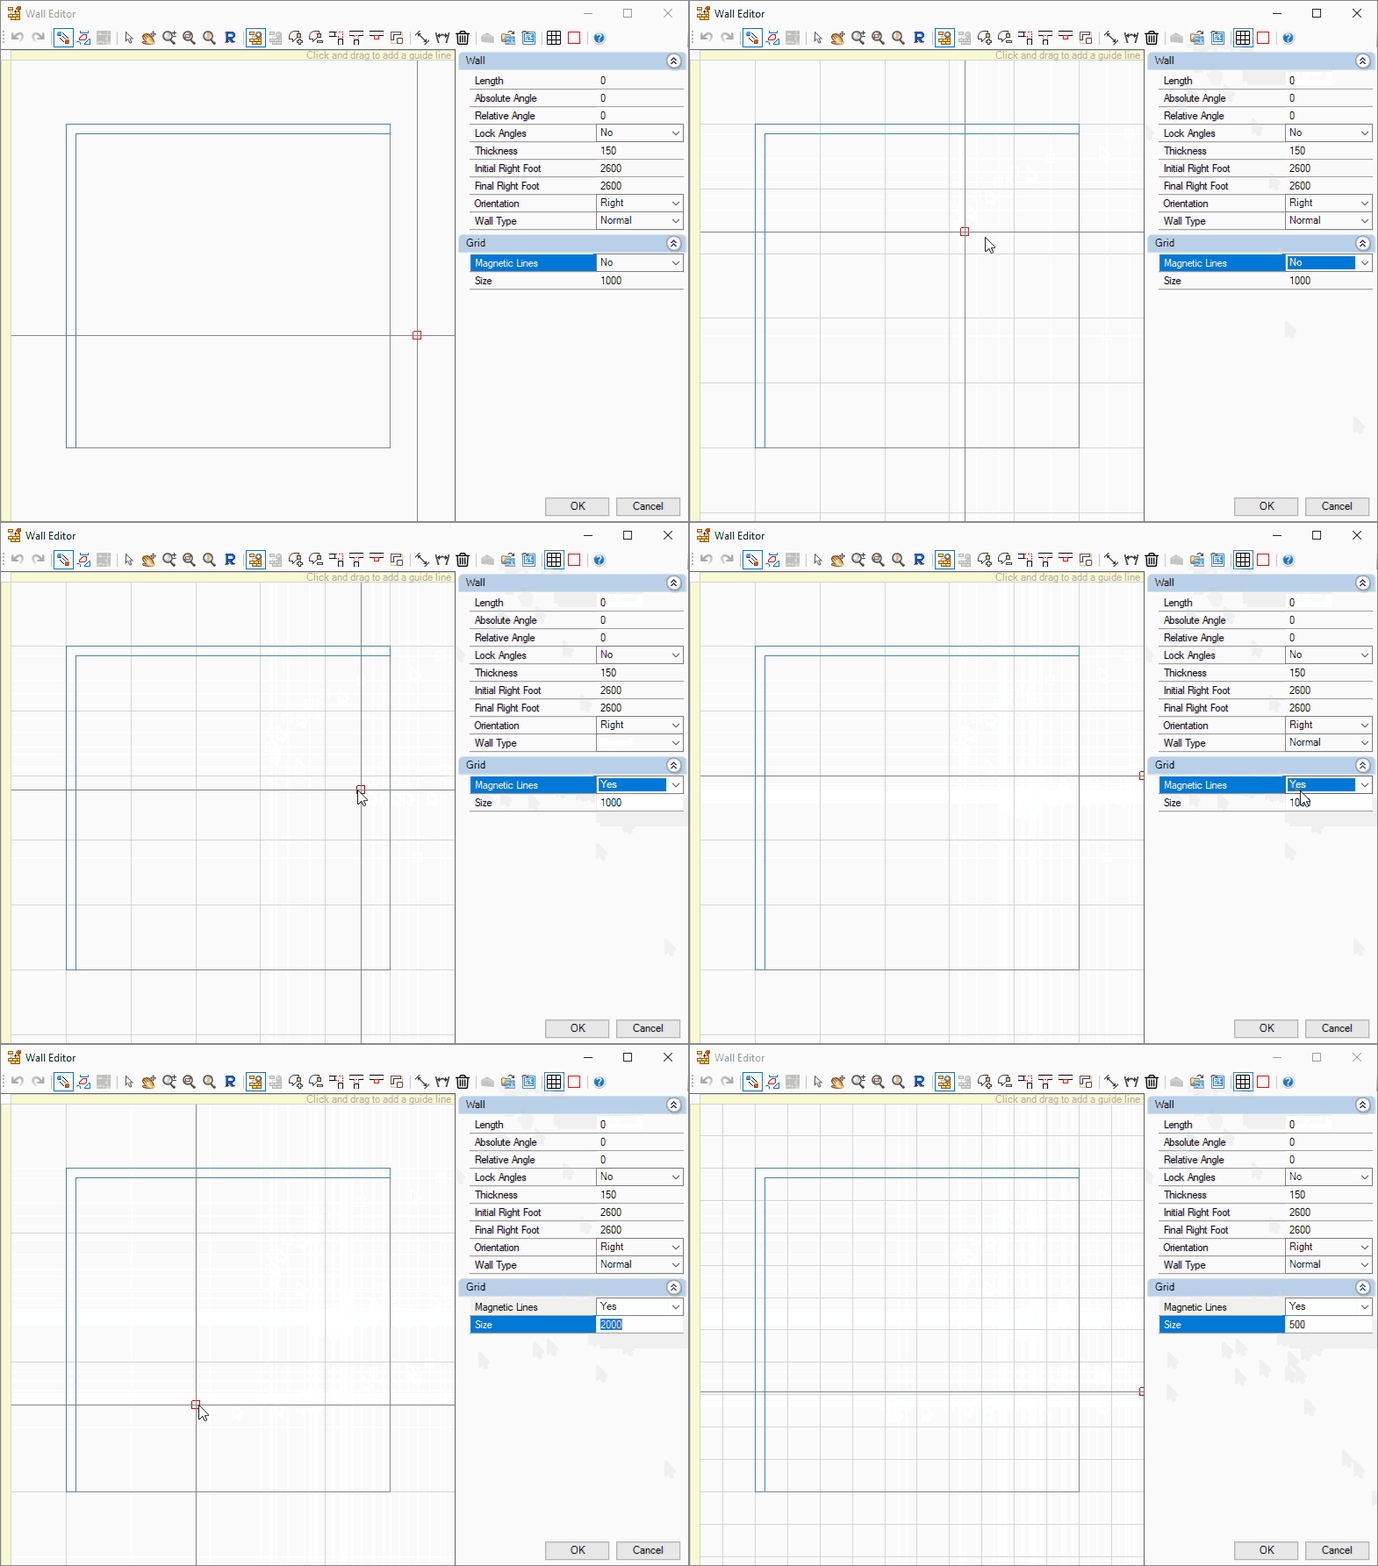
3. It is possible to edit the grid on the floor through the Magnetic Lines and Size options;

4. The Magnetic Lines field makes the guideline stick to the grid lines as it approaches. The Size field changes the spacing between grid lines.
Dimensioning the walls in the Wall Editor
It is possible to create dimensions to identify the size of the created wall, for this:
- Straight dimensions: Click on the first point, move the mouse and click on the second point where you want to end the dimension.
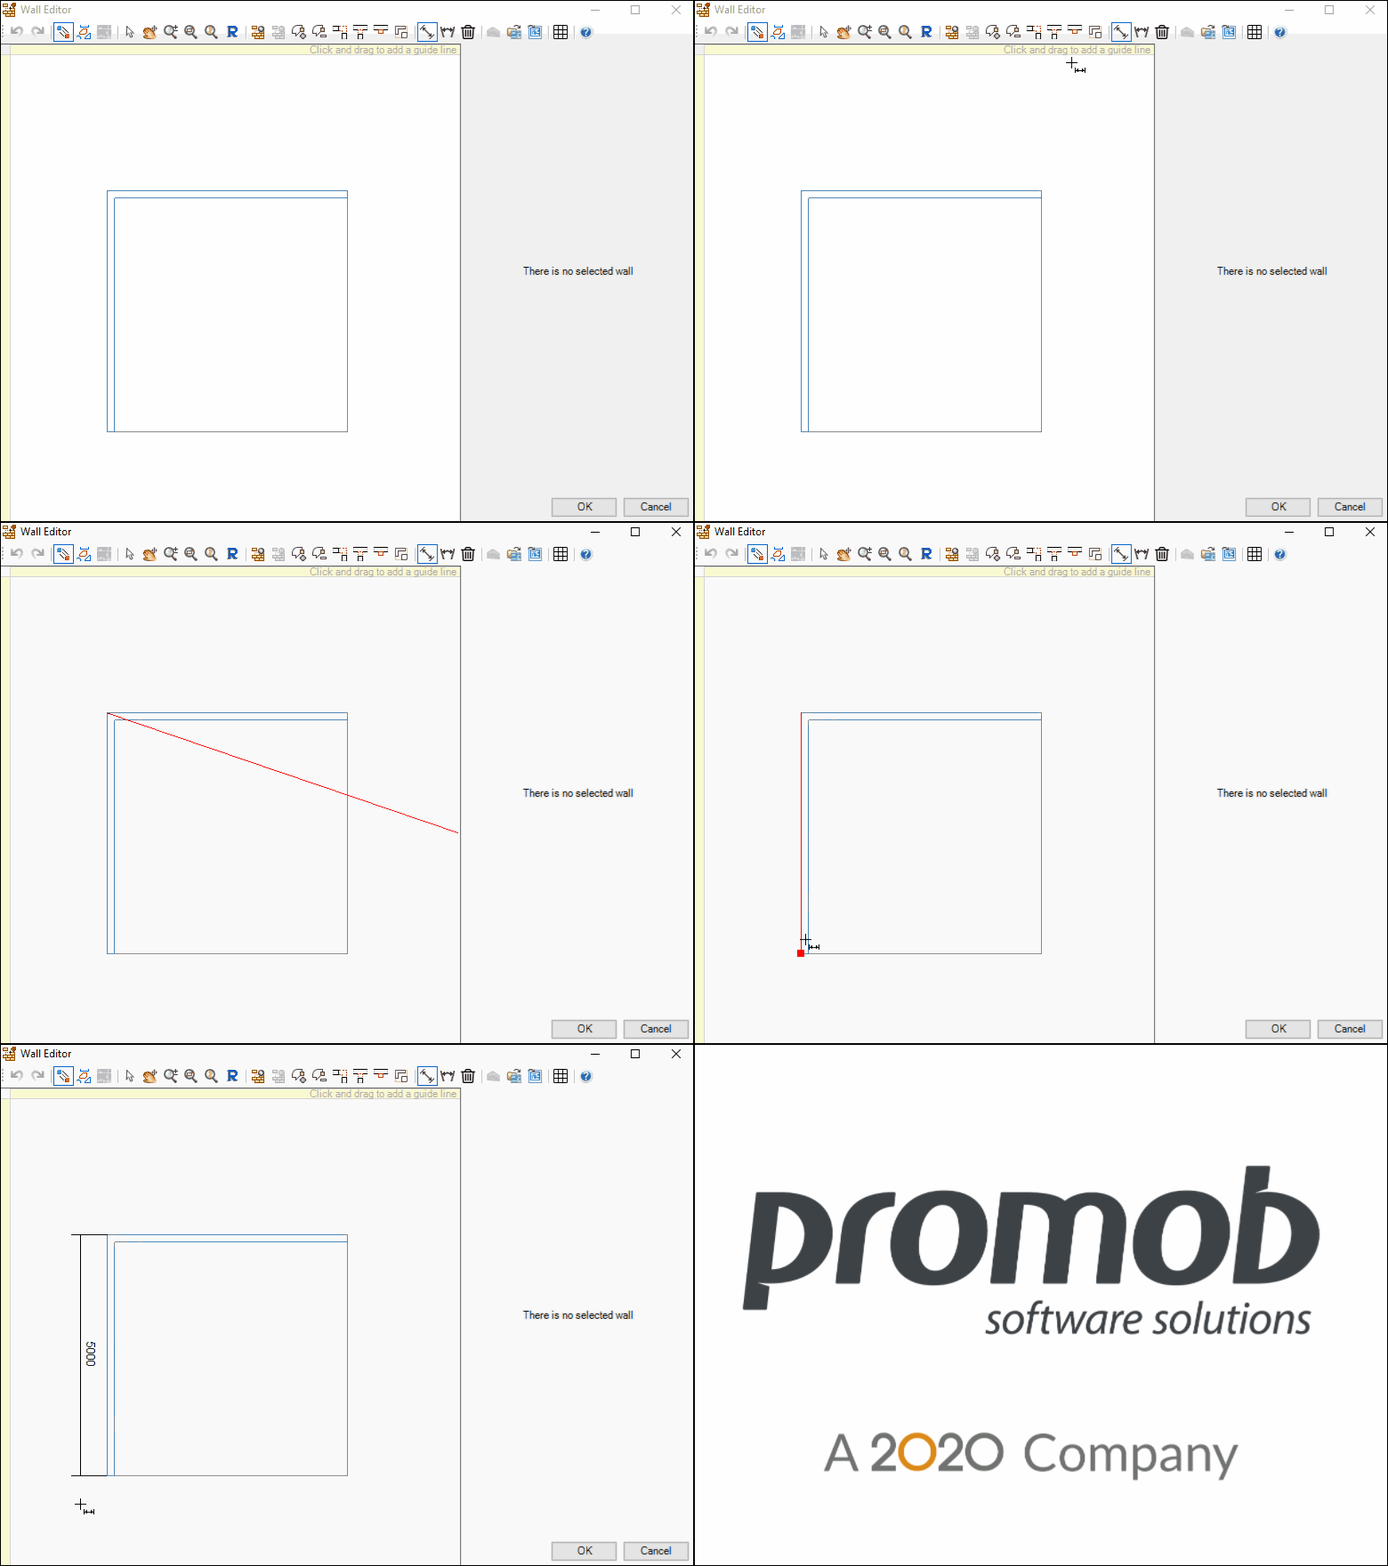
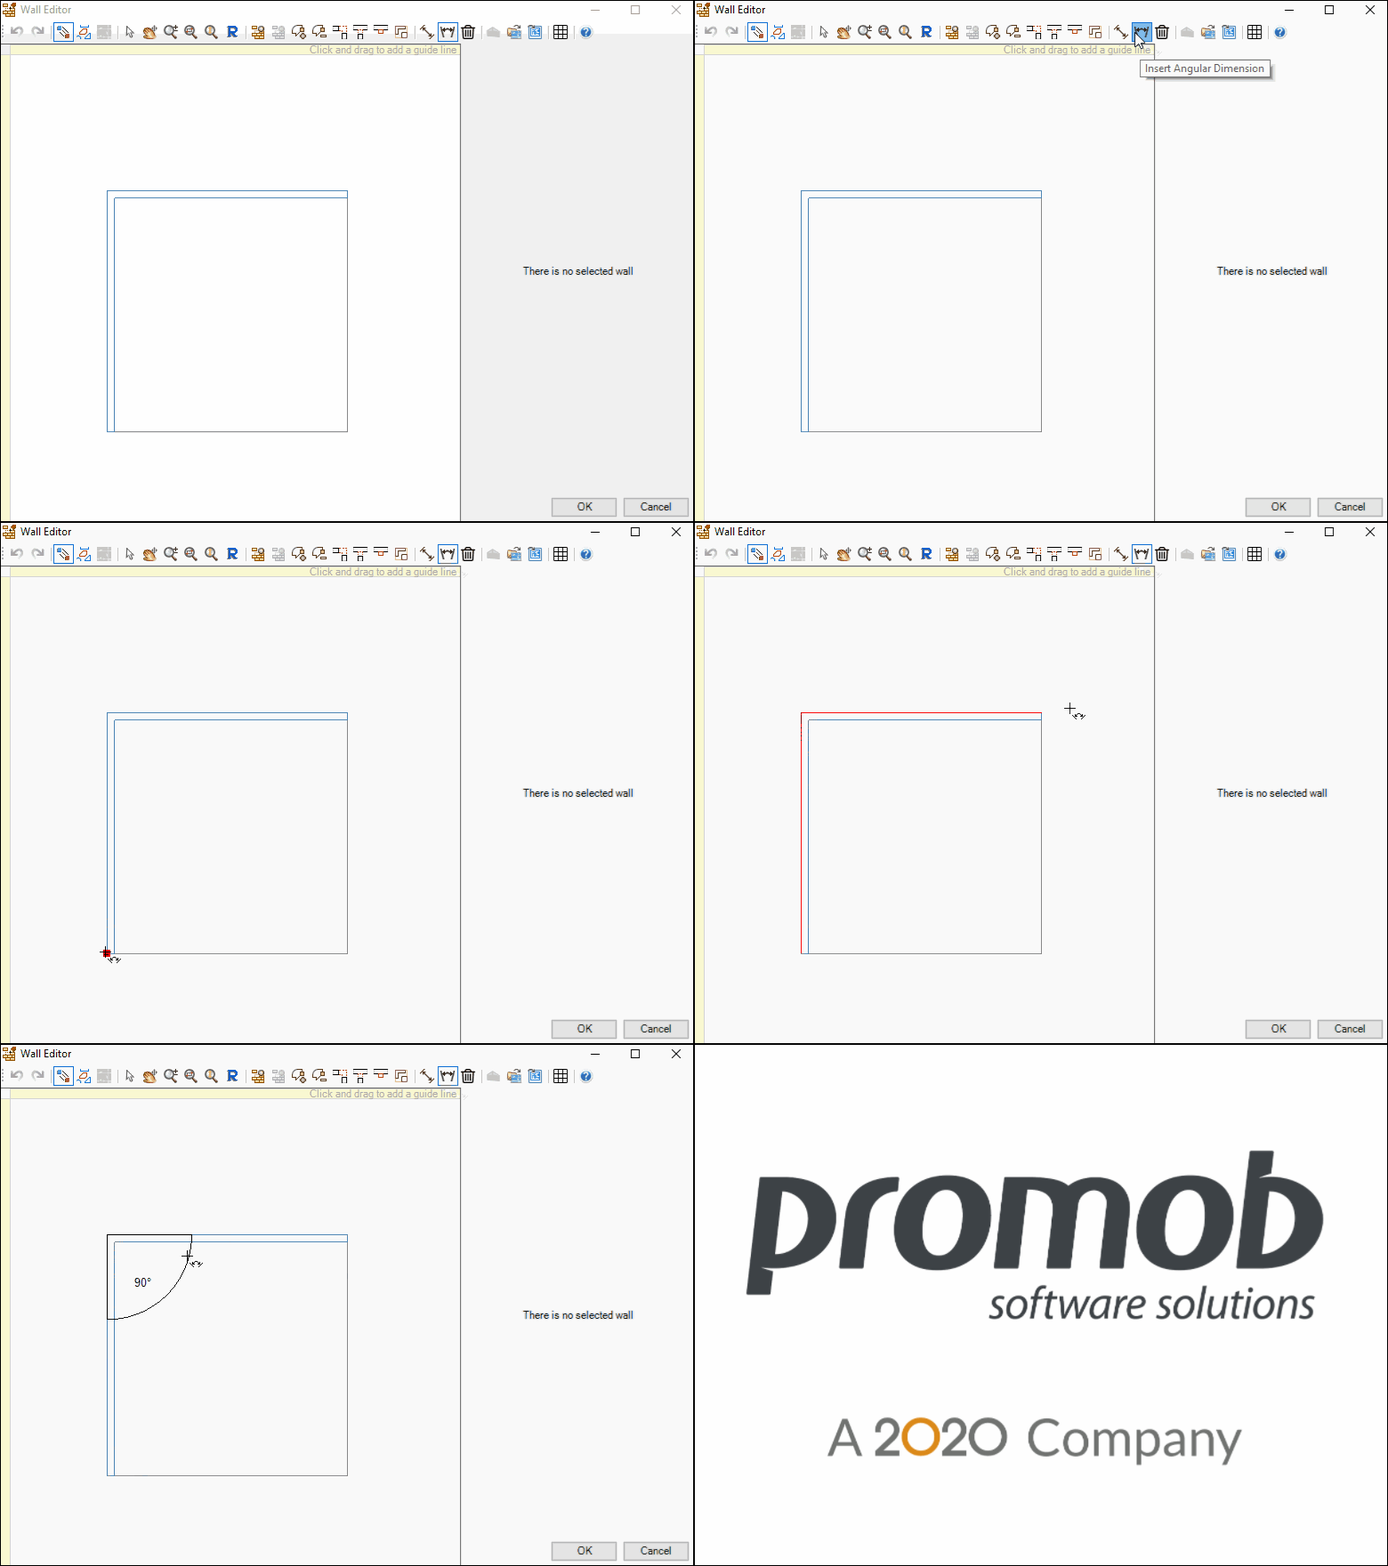
- Angular Dimensions: click on the first point, move the mouse and click on the second point that you want to finish the dimension, again move the mouse to create the desired angle.
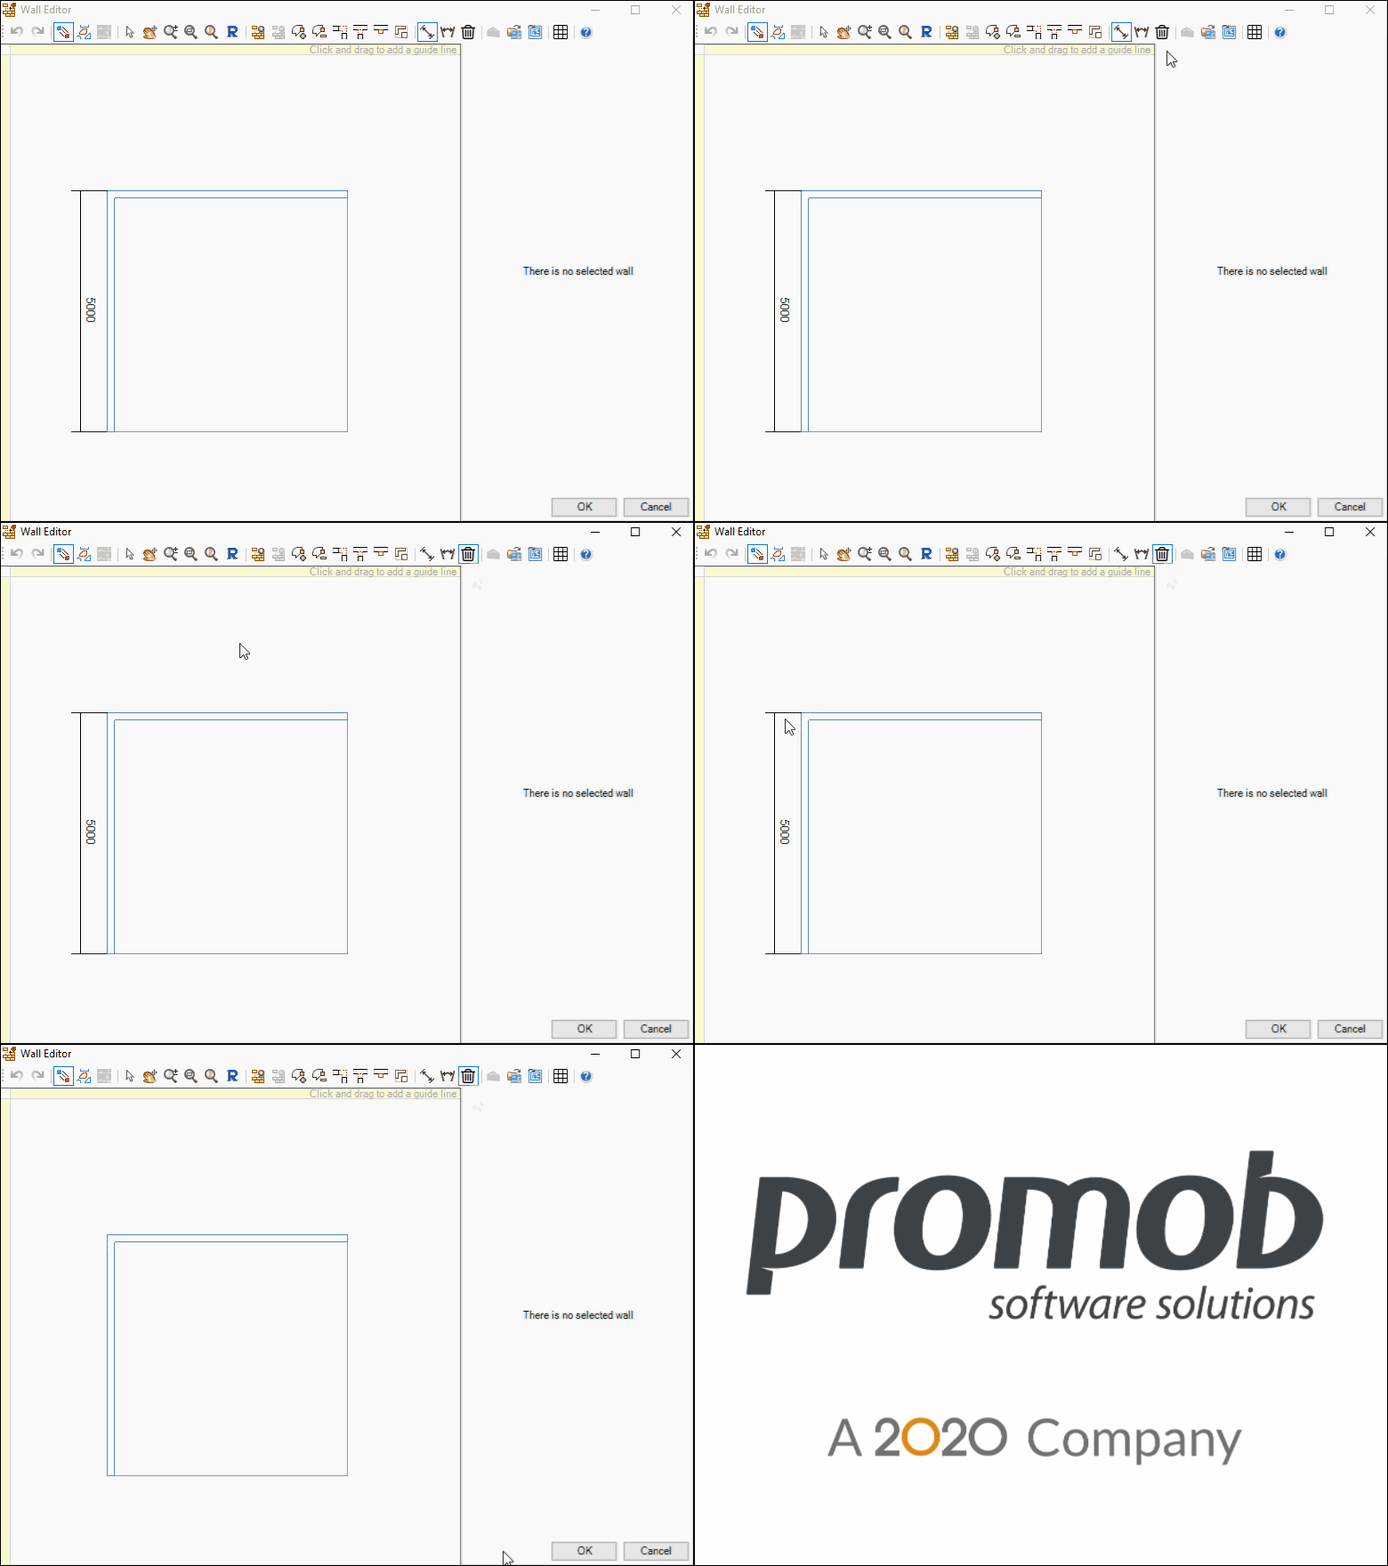
To delete a quota, simply select the quota and click Remove Quota.
Automatic Quota
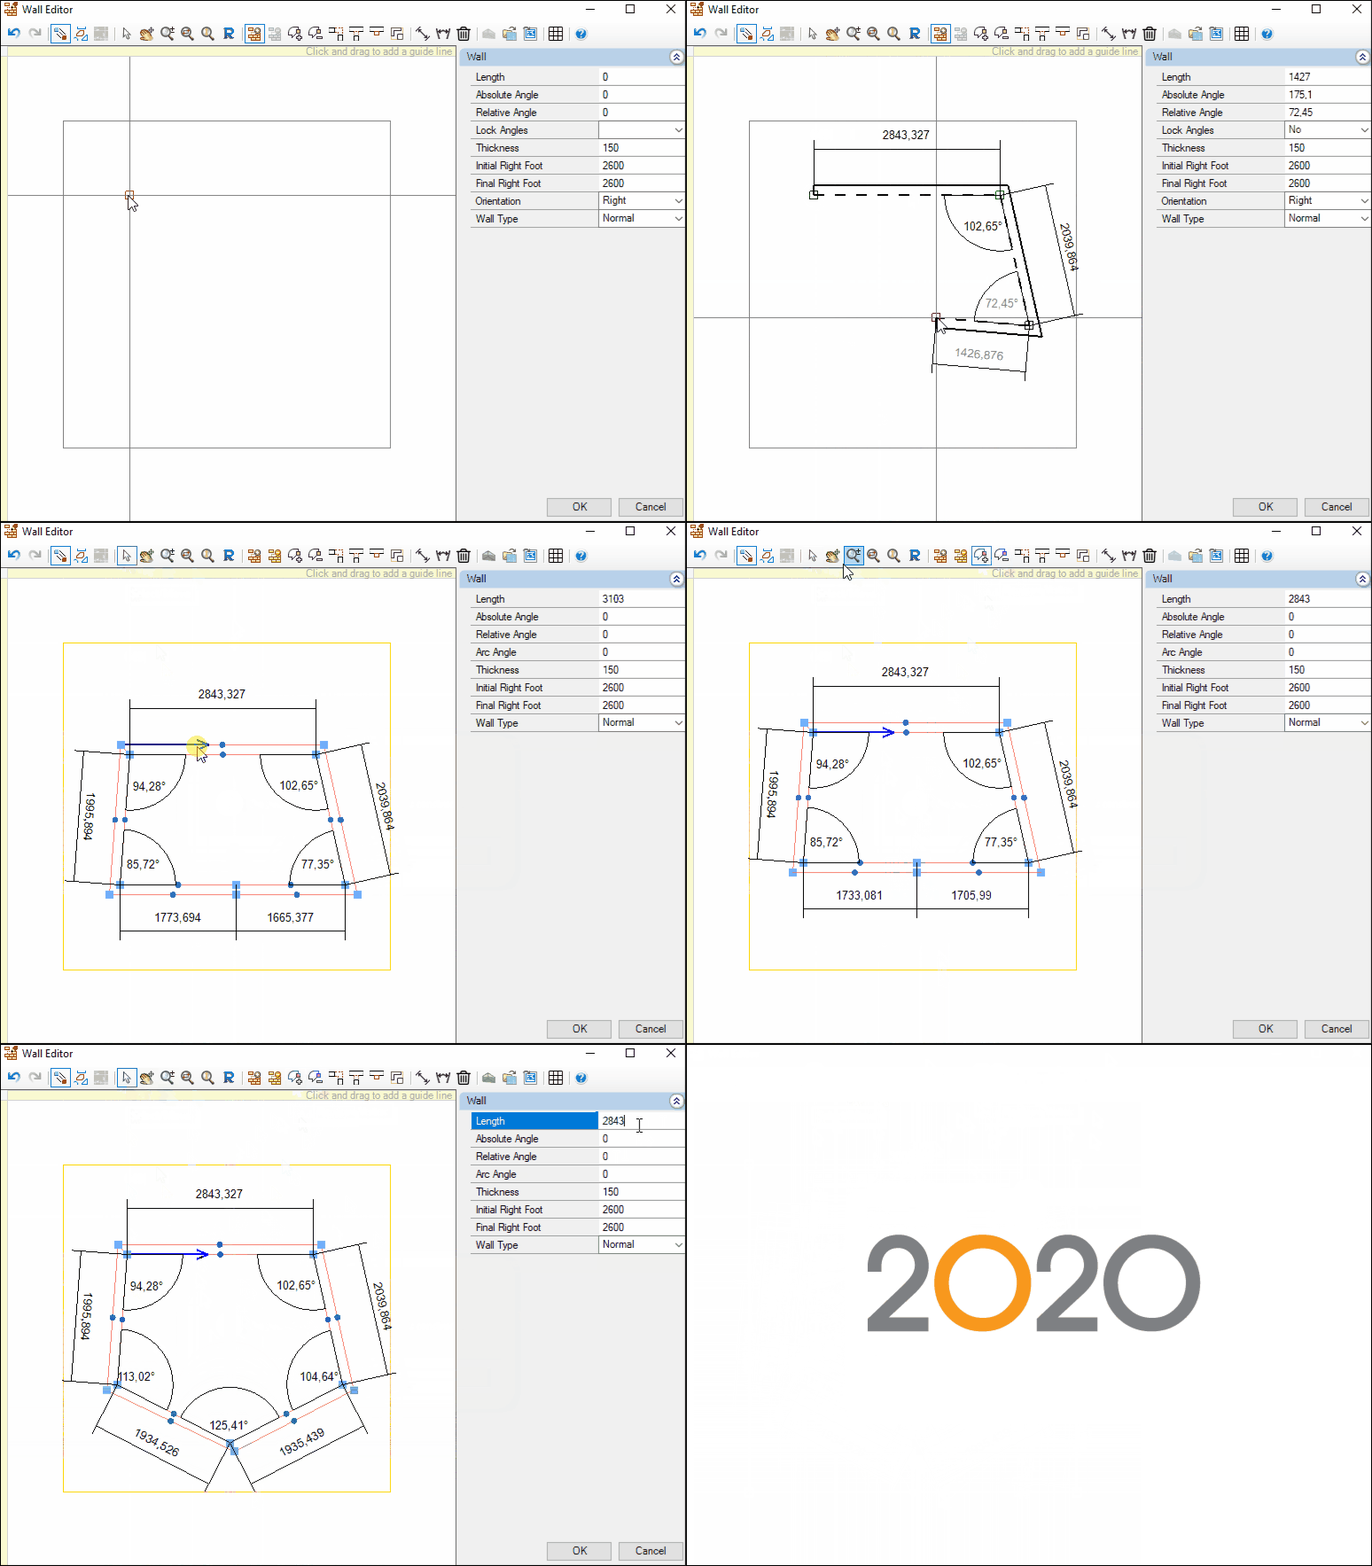
Starting with Promob version 5.60.16.77, when building walls in the Wall Editor, both angular and linear dimensions are automatically displayed. The dimensions are created as the user builds the walls; the dimensions are based on internal vertices, varying according to the orientation of the wall creation.
IMPORTANT:
- When adding a vertex, the necessary dimensions will be created, just as when removing a vertex, the dimensions will be removed;
- The 180º angle dimensions only appear in the preview to instruct the user, but will not appear when the shape is drawn;
- When you change the length in the properties, the affected dimensions will change automatically.
Building curved walls
There are 3 ways to build walls in curves, using the arrow tool, the hotpoints or the Wall Editor.
Arrow
To use the arrow tool, we need to measure A (string) and measure B (arrow) on the wall.

With these measurements, select the inside of the wall and go to the Tools Panel - Properties tab. Click the Advanced button and enter the value (positive or negative) in the Arrow property. To undo the curve in the wall, enter the value 0 (zero) in the Arrow property.
Hotpoints
The creation of curved walls using the Hotpoints tool, does not bring a precision in the construction of the wall. To start the construction:
1. Click the Move HotPoint button on the top toolbar
2. Click on the wall you wish to modify and move the mouse over the wall to display the hotpoints. Position the mouse on the green hotpoint and drag it, forming a curve. Release the mouse.

Wall Editor
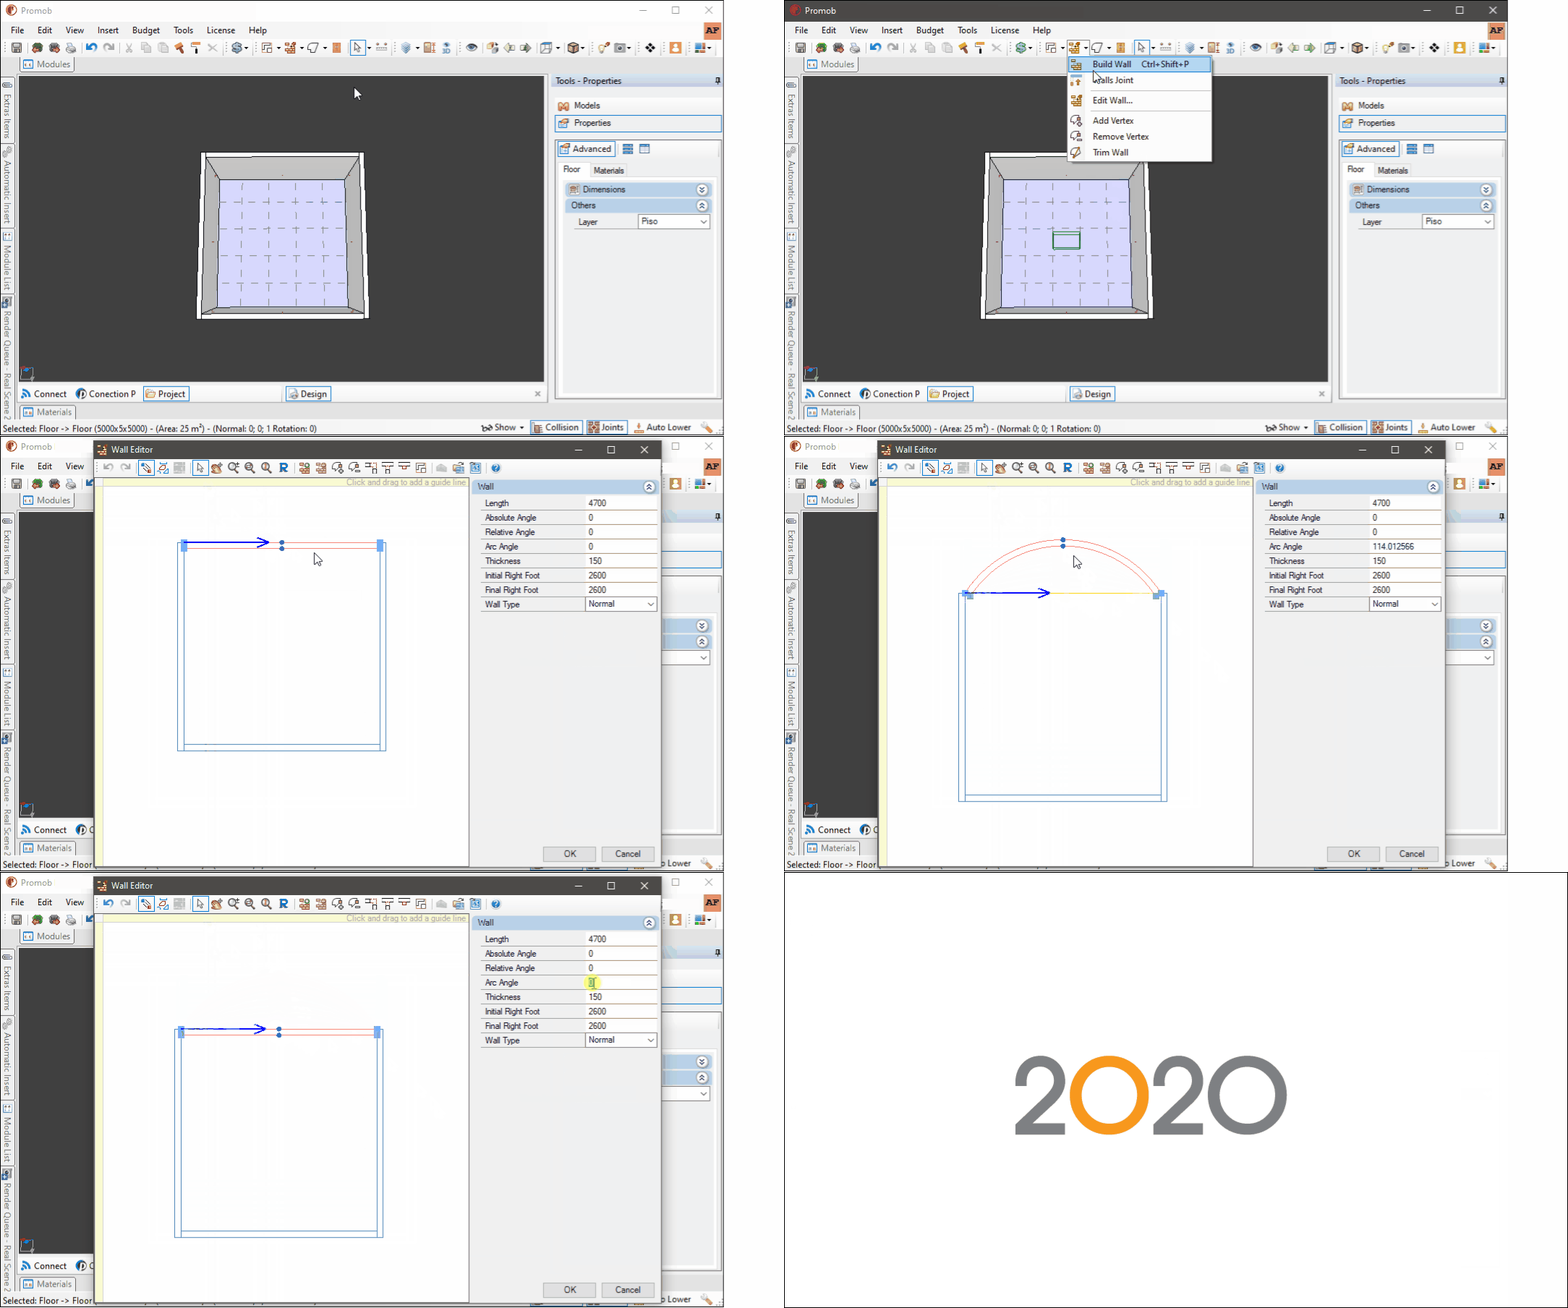
Within the Wall Editor, you can create curved walls in two ways:
1. Accessing the Wall Editor, on the wall chosen to create the curve, select and move the intermediate points.
2. Accessing the Wall Editor, select the wall you want to create the curve and in Arc Angle, inform the angle of the wall arch.
Building Angle Walls
Building angled walls can be done from the 3D space or from the Wall Editor.
3D space
1. Click on the Build walls button on the top toolbar and then click on the floor in the 3D space, where the wall construction will begin.
2. Notice that in the Tools tab - Wall Construction is enabled.
3. When typing the measurement, note that the value will be filled in the Length field, to change some other property, use the Enter key to jump to the relative angle field.
4. Enter the angle value and press enter.
5. To continue building the walls, position the wall to the desired direction and enter the new value, then press the Enter key. Repeat the same process until you have built all the desired walls. When you click on the construction starting point, click Yes on the message that is displayed to finish the construction or right click.

Wall Editor
1. Click the Wall Editor button on the top toolbar.
2. As the Add Wall tool is already enabled when you access the Wall Editor, click the mouse to define the beginning of the construction and its direction. Enter the size of the wall after the relative angle

Building walls with reference
The reference helps us to define the distance from a point to where the wall will be built. The construction of the wall can be done from the 3D space or from the Wall Editor.
3D space
1. After building the main walls of the room, enable the build wall tool again.
2. On one of the already built walls locate the point that will be used as reference for the new wall and move the mouse to the direction in which you want to build the wall. Notice that a blue line appears. This line represents the distance of the new wall from the wall already built in the design.
3. Type the distance you want from the wall already built on the keyboard and press the Enter key.
4. Start building the inner wall and right-click to finish the construction.

Wall editor
1. After building the main walls of the room, go to the Wall Editor and click the References button.
2. On one of the walls already built, locate the point that will be used as a reference for the new wall and click with the mouse. Move the mouse in the direction in which you want to build the wall. Notice that a blue line is displayed. This line represents the distance of the new wall in relation to the wall already built in the design.
3. Type on the keyboard the distance you want from the wall already built and press the Enter key.
4. To start wall construction, right-click and start wall construction. Left-click and then right-click to finish the construction. Close the Editor to view the walls in the 3D space.

Move wall
Moving the walls can be done directly in the 3D space or Wall Editor.
3D Space
1. Select the wall and access the Tools Panel - Properties
2. Click the Advanced button and change the Movable property to Yes. Drag the wall with the mouse to the desired position
3. To move the wall accurately, use the dimension properties, also available in the Tool Panel - Properties.
IMPORTANT: After positioning the wall in the desired location remember to change the value of the Movable property to No, to prevent accidental movement of the wall.

Wall Editor
1. Go to the Wall Editor and select the wall. Drag your mouse to the location where you want to position the wall;
2. Click OK to see the new position of the wall in the room.

Wall properties
After the walls are built, you can make changes via the Tool Panel.
1. Select the wall and go to the Tools Panel - Properties. Click the Advanced button and set:
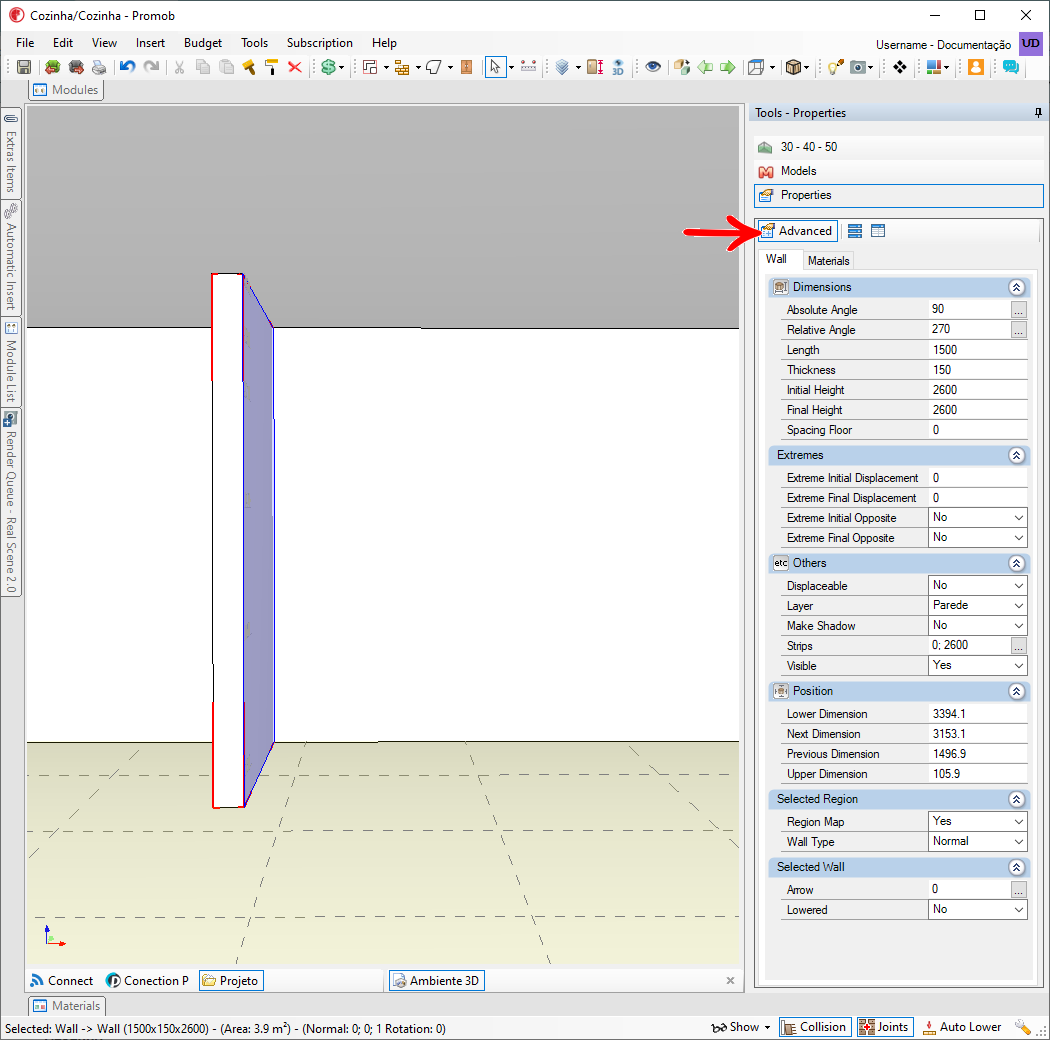
Dimensions
- Absolute Angle: Defines the angle in relation to the direction the edge closure is pointing;
- Relative Angle: defines the angle based on the previous vertex and the current vertex;
- Length: defines the length of the selected wall;
- Thickness: defines the thickness of the selected wall;
- Initial Height: defines the height of the wall's final ceiling;
- Final Height: defines the starting ceiling height of the wall.
- Spacing Floor: defines the distance from wall to floor
Extremes
- Extreme Initial Displacement: defines the displacement value of the initial end of the wall;
- Extreme Final Displacement: defines the displacement value of the end end of the wall;
- Extreme Initial Opposite: defines whether the displacement of the initial end of the wall will happen from its opposite side.
- Extreme Final Opposite: defines whether the displacement of the wall's endpoint will happen on its opposite side;
Other
- Layers: defines the layer of the wall;
- Strips: clicking the Details button displays the Strips Editor window;
- Make Shadow: defines whether or not the wall is shaded in Presentation fill mode;
- Displaceable: defines whether or not the wall can be moved;
- Visible: defines whether or not the wall can be seen.
Position
- Offset: Removal of the module from the plane in which it was inserted;
- Previous Dimension: available distance to the left of the module;
- Next Dimension: distance available to the right of the module;
- Lower Dimension: distance of the module with respect to the floor;
- Upper Dimension: distance of the module with respect to the right foot.
Selected Region
- Region Map: defines whether the applied material starts to be mapped by profile, strip or region of the wall;
- Wall Type: defines the type of the selected wall.
Selected wall
- Arrow: defines the curvature of the wall;
- Lowered: defines whether or not the wall can be recessed.
Segment wall
The walls can be separated into segments to be modified individually.
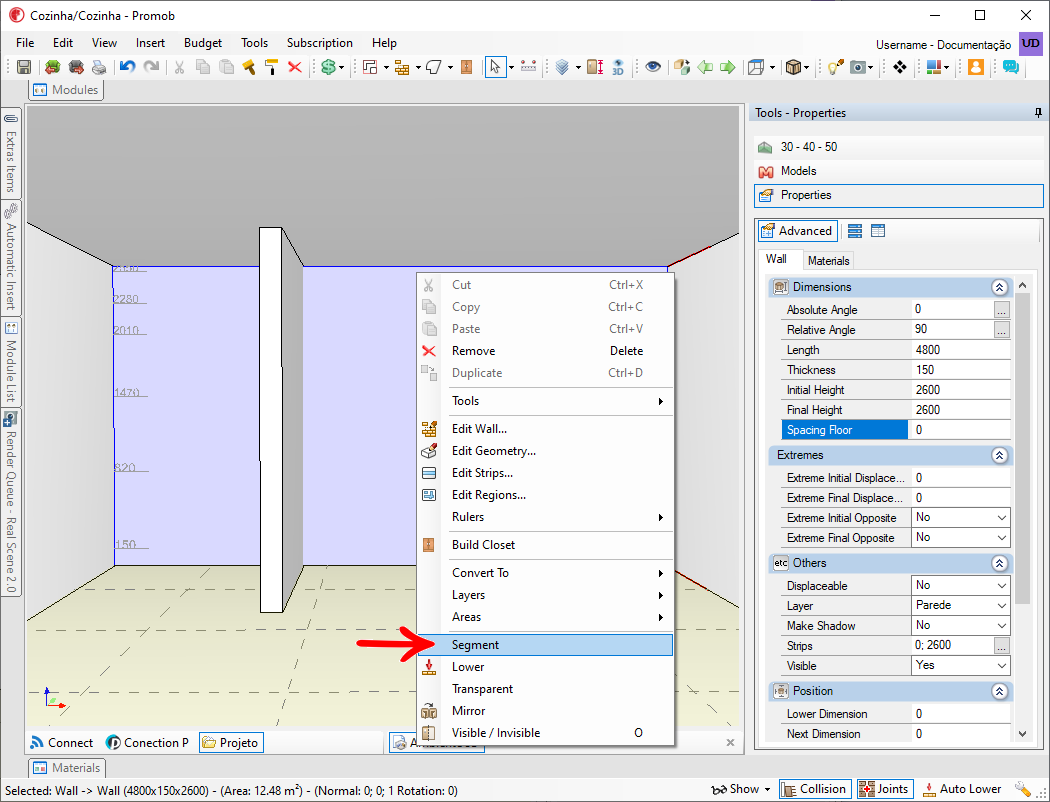
1. Right-click on the wall and select the Segment option.
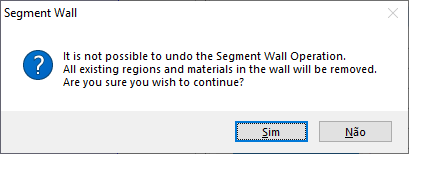
2. Click Yes on the message that appears to confirm the wall segmentation.
3. In this way, a single wall becomes formed by segments, making it possible to change the properties for each wall.
IMPORTANT: It is not possible to join segmented walls.
Meeting Walls
When wall segments (individual walls in the design) are built, it may be necessary to make the walls meet. Through this encounter the walls are visually joined, improving the presentation of the design. This functionality is available in the 3D space or through the Wall Editor.
3D Space
1. After building the walls click on Build Walls - Walls Meeting.
2. First click on the wall (internal or external face) that will move and then click on the other wall.
3. Select one of the meeting options and click OK.
4. Observe the meeting of the walls.

Wall Editor
1. Go to the Wall Editor and click the T Joint button.
2. Notice that the shape of the cursor changes. Click on the wall that will move and then click on the other wall.
3. Observe the meeting of the walls.

Tool 30-40-50
The 30-40-50 tool will help you when you have a design with angled walls to do, but do not know the degree of this angle.
To be able to know the angle of the wall it is very important to make the correct measurement of the actual space. As we will see below:
- Dimension A will always have the value of 300mm from the beginning of the wall.
- Dimension B will always have the value of 400mm from the beginning of the wall.
- With the markings for measurements A and B, draw a line to find measurement C.

3D Space
1. Build the walls according to the physical space.
2. Select the walls and access the Tools Panel - 30-40-50 . The wall that will move is the wall indicated by a red fill. Click on the wall to select it.
3. In properties A, B and C enter the value of the distances previously measured in the physical space and click Apply.

Wall Editor
1. In the Wall Editor build the walls according to the physical space.
2. Select the walls and click the 30 - 40 - 50 button. The wall that will move is the wall indicated by a red fill. Click on the wall to select it.
3. In properties A , B and C , enter the value of the distances previously measured in the physical space and click Apply.
4. The angle is calculated and the walls are adjusted.
