Below are the budget steps:
- How to set up the budget steps?
- How to configure the Apply XSL step?
- How to configure the Payment Terms step?
- How to configure the Calculate Prices and Margins step?
- How to configure the Editing Observations step?
- How do I configure the Submit URL step?
- How to configure the Run Application step?
- How to configure the Export File step?
- How to configure the Generate Document step?
- How to configure the Generate Cut Plan List step?
- How to configure the Engine step?
- How to configure the Presentation Screen step?
- Step Details
How to set up the budget steps?
The budget steps define the processes that will be followed when the budget in question is generated and, therefore, define the configurations that must be compatible, what information must be calculated and passed on during this process.
After creating a new budget, it is necessary to add the budget steps and these must be added as needed. Therefore, below are the specifications for each step and when they should be added, to avoid calculating unnecessary and excess information, thus avoiding a decrease in Promob's performance and budget.
To add a new step:
1. Access the Registry - Budget - Budgets menu.
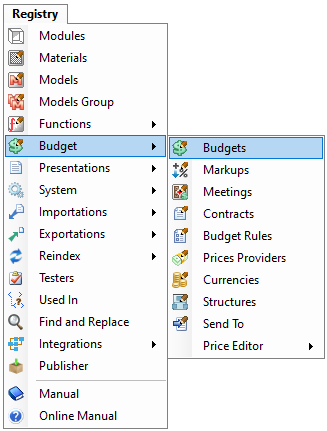
2. Select the budget to which you want to add a new step.
3. Click New and select the step you want to add.
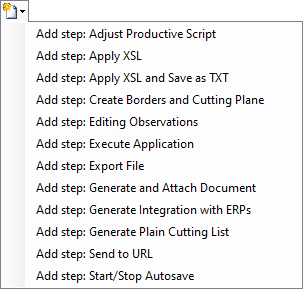
4. Click here for details and guidance on each step.
5. Add the desired steps respecting the ordering rules for each one.
Example 1:
For a budget that calculates prices, margins and allows the user to define payment terms, the steps can be configured as follows:
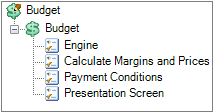
Example 2:
For a listing that should not calculate prices, margins and therefore does not display the option of payment terms, you can configure the steps as follows:
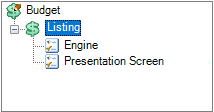
6. After registering the steps, click the Refresh icon to apply the changes. 
How to configure the Apply XSL step?
This step replaces the Presentation Screen step, which serves to display the budget generated on the Promob screen, with the Apply XSL step only generating the budget and requesting a place to save the separate budget, without displaying the budget on the Promob screen.

To configure this step:
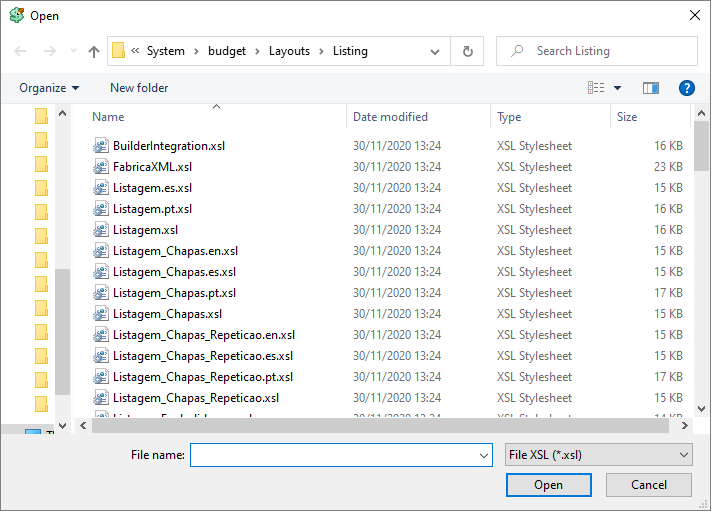
1. In Apply XSL, in the XSL File field, click the Find icon and select the XSL file for the budget layout in question.
2. Fill in the File Name field with the suggested name for the budget file that will be saved, if desired. If desired, you can keep the field blank.
3. Check the request path to save file option if you want the Save As window to open before saving the budget file.
4. In the Layout tab, it is possible to configure the information that should appear in the Layout, instead of selecting the Budget XSL file in the Main tab, using standard and specific actions.
IMPORTANT: If you want to make changes to the budget layout, contact the Catalog Consultancy for assistance.
How to configure the Payment Terms step?
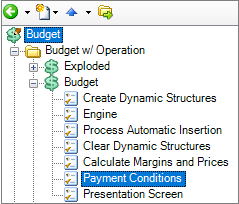
This step defines that the Payment Terms option will be displayed on the budget screen. If added, it must always come after the Calculate Prices and Markups step and before the Presentation Screen step.

This step does not need to be configured, it just needs to be added. After adding the step, click the Refresh icon to apply the changes. 
How to configure the Editing Observations step?
This step defines that, when it is configured, a window will be displayed to save observations about the project or budget.

IMPORTANT: It can be added at any time in the budget, however, it needs to be added after the Calculate Prices and Markups step.
To set up the step:
1. In the Character Limit field, if you wish, you can fill in the maximum number of characters that the observations will have.
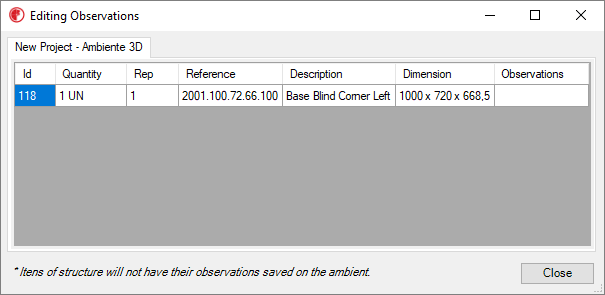
2. In Reference, it is possible to fill in references that should be associated with observations. Example: COMPLETE reference. When the Editing Observations screen is displayed, a column is added with the reference added (image below).
3. In Title, fill in the field with the name you want to give to the reference (if one is added), to facilitate the understanding of the user who will fill in the information.
Below is an image of the Editing Observations screen, which will be displayed to the user if this step is added to the Budget:
How do I configure the Submit URL step?
This step allows you to define that a budget file generated by the Apply XSL step must be sent to a specific address defined in this step.
IMPORTANT: This step must always be defined after the Apply XSL step.

To configure this step:
1. In the URL field, fill in the URL where the generated budget should be sent.
2. The Show Response option defines whether or not a response message will be displayed after sending to the defined URL, whether successful or error.
How to configure the Execute Application step?
This step allows you to define that, at a certain moment, an application should be executed (e.g: cutting plan software).
IMPORTANT: This step must always be added after the Presentation Screen or Apply XSL steps.

To configure this step:
1. Under Application, click on the Find icon and select the application that should be run in this step.
2. In Prefix and Suffix, if necessary, you can fill in characters that define parameters for the application to run.
3. With the checkbox Wait for the scheduled process to finish until the executed application is closed, Promob will be locked for use. Deselect this option if you do not want to stop using Promob.
How to configure the Export File step?
This step allows you to configure that the budget file will be saved in a specific location, according to the configuration performed. Can be added anywhere, and should always be after the stage Calculate Prices and Markups.

To configure this step:
1. In XSL File, click Find and select an *.xsl file to be used for the layout of the file to be exported.

2. Under File Location, click Find if you want to select the default location where the file will be saved.
3. In File Name, fill in a name with which the file will be saved.
4. In Encoding, select the desired option (ASCII, Unicode, UTF-32, UTF-8, UTF-7). The choice must be defined according to the destination of the exported file.
5. Mark the checkboxes as desired:
- Require saved project: In order for the file to be exported, you will be asked to save the project at least once.
- Allow to change the file folder: With this option checked, the user will be able to change the file's destination folder, defined in the File Location field.
- Allow to change the file name: With this option checked, the user will be able to change the file name, defined in the File Name field.
- Show Save File Window: This option is only enabled and automatically checked when the Allow to change the file folder and Allow to change the file name options are checked simultaneously so that it is not necessary to display two windows (Change folder and change name) when exporting the file.
6. In the Layout tab, it is possible to configure the information that should be included in the Layout, instead of selecting the Budget XSL file in the Main tab, using standard and specific actions.
IMPORTANT: If you want to make changes to the budget layout, contact the Catalog Consultancy for assistance.
How to configure the Generate Document step?
This step allows the generated budget to be automatically attached to the project. Usually, it can be added after the main steps (Engine, Calculate prices and margins, presentation screen), so that it can be executed only after closing the budget.

To configure this step:
1. In the XSL File field, click Find and select the XSL file that should be used as a base;

2. In the Description field, fill in the name of the budget that will be attached;
3. After making the desired settings, click the Refresh icon to apply the changes. 
How to configure the Generate Cut Plan List step?
Step used to list the project's plates, usually in specific lists for plates.
IMPORTANT: In order for the items to appear in the list of plates, it is necessary that they have the Component attribute.
This step must be ordered right after the Engine step. As it is used only in listings, normally the order of the listing steps should be:
1. Engine
2. Generate Cut Plan List
3. Presentation Screen

To configure this step:
1. In Generate cut plan list, it is possible to configure which references should be used in the list:
- Material reference: Defines the material reference (MDF, MDP, BP, Aglom, etc.), among the references already registered in Registry- System - References
- Finishing reference: Defines the finishing reference (finishing model), among the references already registered in Registry- System - References
- Thickness reference: Defines the thickness reference, among the references already registered in Registry- System - References
If no reference is selected, the COMPLETE reference for each component will be used. In this way, configure the specific references only if necessary.
2. If you want the plate repetitions to be compacted, check the option Compact repetitions.
IMPORTANT: To configure this step, it is necessary that the list layout is specific to this type of configuration.
How to configure the Engine step?
This stage is the main stage to be configured, as it defines the way in which the modules should be presented on the budget screen.

To configure this step:
1. In Reference, select the reference to be used by the Budget Engine.
This reference is used in the registration of the modules and has the modulation coding information. Generally, the COMPLETE REFERENCE is selected, which is related to the COMPLETE reference of the modules.
2. In Mode, define how the project modules are presented in the budget.
Common: This mode does not respect the hierarchies defined by the BudgetAggregate attribute. In the list of items, they are displayed in a list without distinction of hierarchy, without differentiating components and modules, one below the other.
Explosion: This mode respects the hierarchies defined by the BudgetAggregate attribute. In the list of items, they are displayed in a list with the distinction of hierarchy, differentiating components and modules, showing the components with a greater indentation in relation to the modules.
IMPORTANT: For these modes to work correctly, it is necessary to develop budget layouts specific to those modes. If your Catalog does not have such layouts ready, contact the Catalog Consultancy.
3. Check or uncheck the checkboxes as desired:
a) Process Separate Environments: with this option checked, when having more than one 3D environment to budget (as shown in the image below), the modules will be separated by the environment in the budget. With the option unchecked, the modules from both environments are displayed in the same list.

With the Process Separate Environments option checked:
With the Process Separate Environments option unchecked:

b) Process Categories: groups the modules of the environment according to their category. These categories are defined in the module's budget register.
With the Process Categories option checked:

With the Process Categories option unchecked:
c) Allow Extra Library Item: With this option checked, the modules whose prices have been informed through the Tool Panel (Example: geometries, Decore items) display the configured price. With the option deselected, such items will not be displayed.
With the Allow Extra Library Item option checked:

With the Allow Extra Library Item option unchecked:

d) Allow Extra Item: If the project has extra items, with the option checked, they are shown in the budget. If the option is unchecked, the extra items will not be displayed in the budget.
e) Compact Repetitions: Groups the same modules and the same dimensions in a budget line, including linear modules such as shelves, tops, etc., showing the number of repetitions in the Rep column. Its correct functioning depends on the budget layout.
f) Compact Quantity: If this option is checked, so that the quantities are compacted, instead of repetitions, it is necessary that the budget rule has the option Sum of quantities checked.
g) Compact Converted Geometries: This option is dependent on the Compact repetitions option. With the option Compact repetition checked, if there is an item in the environment that is a geometry converted to a modulation item, this item will also respect the repetition rules.
h) Consider Observations on Compaction: This option is dependent on the Compact repetition option. With this option checked, the items will only have the repetition compressed if the observations between the items are the same. These observations are configured directly in the designs and defined in the environment by selecting the item, in the Tools bar.

3. After making the settings, click the Refresh icon to apply the changes or continue configuring the budget steps. 
How to configure the Presentation Screen step?
This step defines the layout of the budget presentation screen, must be added last, or after the Calculate Prices and Markups and Payment Conditions steps, if they are added.

To configure this step:
1. In XSL File, click on the Find icon and select the XSL file corresponding to the desired budget layout;

2. In the Description field, add the desired layout name. This information is not displayed anywhere on the budget page, it only serves to help differentiate presentation pages.
3. After making the settings, click the Refresh icon to apply the changes. 