The quality and realism of the project's render depends on some aspects, namely: materials, lighting and render settings. Here, we will share everything you need to know to generate a realistic render in Real Scene 2.0.
Materials
Applying finishes to the materials inserted in the project is extremely important to give more realism to the rendered images.
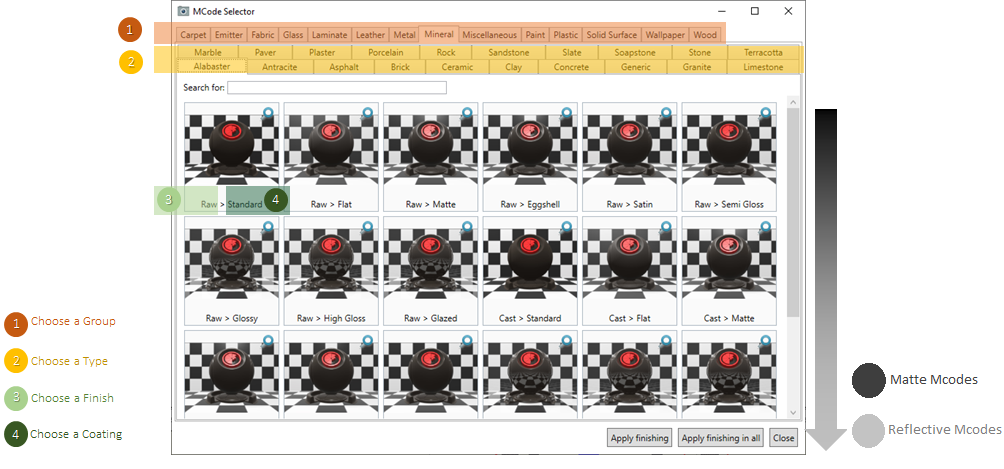
MCodes are finishes already configured that we can associate with the materials of your scene to produce the appearance of objects in real life.
MCodes are organized into 4 categories:

To make your choice easier, Mcodes are organized from the most matte to the most reflective.
TIP: If Mcode's chosen is too reflective, choose Mcode before him.
IMPORTANT:
- Standard Mcodes: For materials with base Color.
- Others Mcodes: For materials with basic Texture.
Group e Type
As well as products organized by department and shelf, Group and Type are the first two categories that classify MCodes.
In the example below, we selected fabric for group and velvet for type.

Finishing
Finishing is equivalent to Material Roughness. The less rough the material, the more it reflects, the more defined is the shape of the (specular) brightness perceived on the surface close to the light, and the greater the intensity of this "burst of light".

Here, we have the example of finishes for the Metal group of type Stainless Steel.

In the example below, we selected fabric for group, velvet for type and peach skin for finishing.

Coating
The coating is like a layer of varnish, which added to the finish can intensify or make its finish more opaque. In practice, coating is an additional layer of reflection.

So, in the example below, we finished configuring this item with fabric for group, velvet for type, peach skin for finishing and pattern for coating.

IMPORTANT: To choose MCode, you must ask yourself: "What does my module look like" and not "What is my module made of?"
MCode will not always correspond to the name of the module's manufacturing material or coating. Feel free to venture among the options and choose MCodes of different types and groups, for artistic purposes. As we can see in the example below:

Often the difference between MCodes is subtle. This is because each combination is inspired by physical parameters. It also means that Polished> Pattern of Glass Group is different from Polished> Pattern of Wood Group . See below 120 possible combinations.

Lighting
To ensure a good presentation result of the rendered images, it is essential to perform the correct configuration of the lights. Remembering that the lighting effects can only be seen after the project has been rendered.
In the settings of Real Scene 2.0 it is possible to configure the altitude, azimuth, colors and light intensity. Next, we'll look at each of the settings.
Altitude
With the sun lower, sunlight penetrates the environment more easily, generating longer shadows.

Azimuth
The rotation of the sun around the project defines whether the light will enter directly through the window and can be used to give drama to the scene, changing the location and shape of the incidence of light.

Colors
In real life, color is light! The colors of objects and light sources mix and "change" according to the surface on which they are applied. For Real Scene 2.0 too. The colors you see are the result of a play of lights and reflections.
In the comparison below, a change in the color of sunlight was made. Notice how the seats now have a different color. None of the objects below had a color change (RGB).

Light Intensity
It is quite common to find projects with the aspect of flattened scene. The rendering quality of the two images is the same, but the quantity and intensity of lights are different between them. With less light, the scene on the right has soft shadows and volume.

Render settings
Render Quality offers an opportunity to control the amount of refinement, and therefore the rendering time. The finish (MCode) selected for the item can have a different result in each of the qualities. This happens to prioritize performance in the initial and final qualities, for example.

TIP: Using the features mentioned above it is possible to improve a scene with simple adjustments.
Before

After
