Available from version: Plugin Builder: 1.60.16.2
The integration with the latest machine plugins allows the reuse of boards already used and that can still be cut (leftovers), in order to save resources and enable the registration of custom sizes for use in Nesting.
Setup
In the Setup settings of your machine Plugin, when performing Nesting and using the Promob cutting engine, two new options are enabled. See below:

NOTES:
- Checking the first option displays the second and deselecting it hides it.
- While the first option is checked, when generating machine programs or cutting plans, the registration window for custom sheets (leftovers) will be displayed, according to the selection in the second option: Before, After, or Both.
IMPORTANT: These settings will be disregarded when generating Integration with ERP or Promob Worker Plugins.
Registration of boards
The board registration window is slightly different depending on the configuration in the Setup and is responsible for defining which boards will be considered in Nesting. Below is the definition of the functionalities:
Before generating Nesting
With the option Before and after Nesting generation or Only before Nesting generation selected, when generating machine programs or cutting plans, the window below is displayed. In it, it is possible to add new boards and define the desired settings.
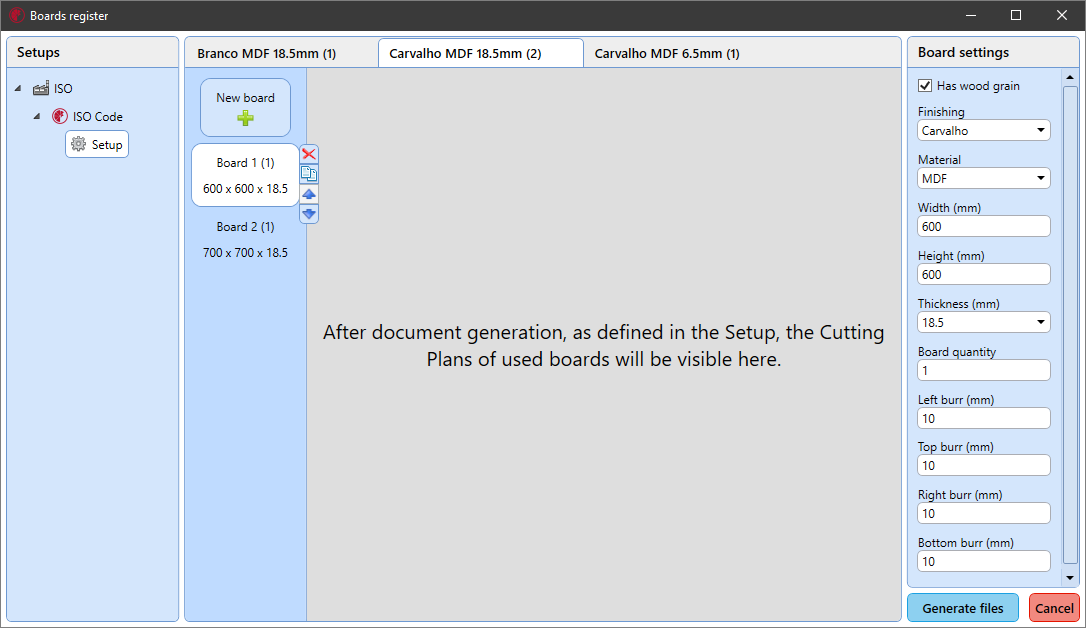
This window has three divisions:
• The first one, Setups, displays all the settings that have the option Use custom board for the selected cutting plane and the window display options set to Before or Both;
• The second, Boards and Materials display all registered boards, categorized in tabs, by material (the creation and order of the tabs are automatic, based on the information on the finish, material, and thickness of the boards). In it is possible to exclude a material, with its respective boards and also to add new boards, to exclude and duplicate them, as well as to modify the order of priority in which they appear;
• The third, Board Settings, displays the settings that can be edited for each board, they are:
• Has vein: Indicates whether the board vein should be considered in Nesting;
• Finishing: List with the finishes that can be selected (the available options are according to the pieces in the 3D Space);
• Material: List with the materials that can be selected (the available options are according to the parts in the 3D Space);
• Width (mm): Decimal value that defines the width of the board, in millimeters;
• Height (mm): Decimal value that defines the height of the board, in millimeters;
• Thickness (mm): List with the thicknesses that can be selected (the available options are according to the parts in the 3D Space);
• Number of boards: Integer value that defines how many boards with a certain configuration should be used;
• Left trimming: Decimal value that defines the value of the left trimming, in millimeters (the default value is configured in Setup);
• Top trimming: Decimal value that defines the top trimming value, in millimeters (the default value is configured in Setup);
• Right trimming: Decimal value that defines the value of the right trimming, in millimeters (the default value is configured in Setup);
• Lower trimming: Decimal value that defines the value of the lower trimming, in millimeters (the default value is configured in Setup).
NOTES: Select Generate files, proceed with the generation of programs, labels, and Nesting using the registered boards. Selecting Cancel ignores the registered boards but proceeds with the generation of the files.

IMPORTANT: The order in which the sheets of the same material appear determines their priority for use in Nesting. In the example above, the 600x600x18.5 sheet of Oak MDF material will be used first in relation to the 700x700x18.5 sheet of the same material, for example.
After generating Nesting
With the option Before and after the generation of Nesting or Only after the generation of Nesting selected, when the generation of machine programs or cutting plans is finished, the window below is displayed. In it, it is also possible to edit the used boards and define new configurations to generate Nesting again, if desired.
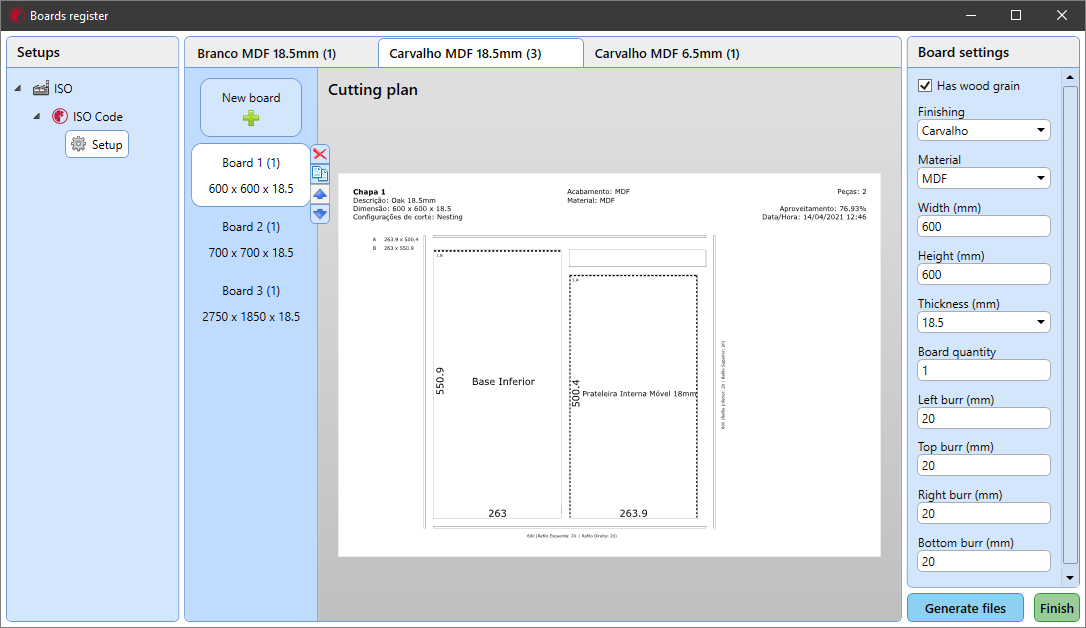
This window also has three divisions:
• The first, Setups displays all settings that have the option Use custom boards for the selected cutting plane and the options for the window display set to After or Both;
• The second, Boards and Materials, displays all the boards that were used to generate Nesting, also categorized in tabs, by material, as in the previous example. And in it, the same possible actions of Before generating the Nesting are available and the respective Cutting Plan of each board is also displayed;
• The third, Board Settings, displays the settings that can be edited for each board, as in the previous example.
NOTES: when selecting Generate files, the programs, tags, and Nesting are generated again, using the registered boards. When you select Finish, the file generation ends, displaying the generated programs report.

Demonstration
The following is an example of how the complete generation process behaves, using the configuration below:

